
DIY Unicorn Hair Tutorial
I’ve made my peace with being the Mean Mom. I have. I’m not in this to win any popularity contests. I have high expectations and a low tolerance for shenanigans when it comes to my kids and “but everyone else” bounces right off my furrowed eyebrows, I assure you. This is probably why I wish I had a nickel for every time a fellow parent has turned to me, mouth agape, and said, “You not only let her do that to her hair, you helped her??”
I don’t get worked up about hair. It’s just hair. It grows. I’m happy to aid and abet hair experimentation, because 1) if not now, when? (Answer: possibly in adulthood when it may be a barrier to success.) And 2) Given all of the available choices for teenage rebellion available… yeah, I’ll take the hair thing, thanks.
My teen daughter has been playing with her hair for about five years, and here’s my dirty little secret: I love watching her. She’s figuring out who she is and what she likes and whether she’s okay standing out and how much she cares (or doesn’t) about what other people think. You can learn a lot from a kid this way. This summer, she has her first real job. And while I’ve bought her the occasional bottle of dye in the past, when she announced she wanted to go full rainbow hair I said that if she really wanted to, that was going to be expensive, so she should be prepared to pay for it herself. So she did. She bought the supplies and we got down to business.
Today, I’m going to give you the full step-by-step instructions to turn your own teen into a beautiful unicorn (horn not included).
Formulate Your Plan/Buy Supplies
This is not a run-to-the-drugstore-for-a-single-box endeavor, and you definitely don’t want to get caught in the middle realizing you’re missing something. You will need:
Miscellaneous items: Old towels, a cape (a garbage bag with a head hole will work, if you don’t have one), and a drop cloth (or a few old sheets) to protect your budding unicorn and the area where you’ll be working. You’ll also need multiple pairs of good latex or rubber gloves (the ones that come with kits are junk), a few plastic grocery sacks, tiny rubber bands you don’t mind cutting/throwing away, regular ponytail holders and maybe a few hair clips, mild shampoo, apple cider vinegar, tinfoil cut into rectangles (you can buy “hair foils” precut from the beauty supply store, but cutting up your Reynolds at home is fine), and disposable plastic cups and stirrers if you’ll be doing color mixing. And coconut oil! We love coconut oil.
Bleaching supplies: If this is your first time, and/or if you’re nervous, a box kit is fine, here. You are looking for the lightest blond shade available. Bear in mind that if you’re starting out as a brunette, you’re not going to achieve the white blond shown on the box. (If you’re starting with black hair, it’s even trickier.) With previously dyed or very dark hair, you should either visit a salon for proper bleaching or visit a beauty supply store for the big guns—separate powder bleach and cream developer. (More on that in a bit.) If your intended unicorn is already a blond, skip this step, obviously. (Obviously use common sense and of course read the packaging carefully and follow the manufacturer’s guidelines for safety and age. *We don’t recommended this step for children; Mir’s daughter is an older teen.*) .
Color supplies: In our years of experimentation, we’ve come to believe that Special Effects is the hands-down winner when it comes to vibrant, lasting colors. No other dye comes close. Not Manic Panic, not Splat, nothing. Want pretty color? Buy Special Effects. My daughter wanted the whole rainbow, but also wanted to save some money and there is currently a shortage of SE yellow, so we ended up with Special Effects in Nuclear Red, Iguana Green, Blue Mayhem, Deep Purple, and Atomic Pink. She purchased a yellow in another brand and mixed that with the red to make her orange. (The yellow and orange are already fading. Did I mention that you should stick with Special Effects?)

Step 1: Bleach The Hair To Be Colored
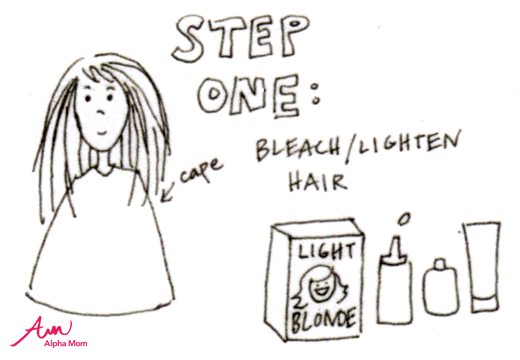
Hair bleaching is serious business, so while I believe you can do it yourself, at home, please outsource this step if you’re nervous. Bleach is very damaging under the best of circumstances. This is also part of why we’ve so far stuck to treating just the ends of the hair—if something goes wrong, we can always just cut it off! And even after all this time, I have no interest in putting bleach near my teen baby’s scalp.
As I mentioned above, previously-dyed or very dark hair may be impervious to the boxed stuff, in which case you’ll want to hit the beauty supply store for bleach and a 20 or 30 volume developer creme for greater oomph. [My daughter still had some year-old Atomic Pink in her hair which had resisted all of our attempts to strip it; we used L’Oreal Quick Blue and level 40 developer to get her hair mostly back to blond, and I cannot stress enough that this was very risky and a last resort. I checked her hair constantly; please don’t buy a developer stronger than 30 unless you must and really know what you’re doing.] Get your unicorn-to-be situated under a cape and old towel outside or in a very well-ventilated area, with unwashed hair combed out and ready for application.
Mix your bleach according to directions and begin applying it, one section of hair at a time (I like to grab a “clump” about two fingers wide, and I tend to start by the face on one side, hit the matching area on the other side, and continue working back and forth like that until I reach the back), making sure the hair is saturated, then fold the bleached area into a piece of tinfoil to cover completely. There are two schools of thought, here: You can either determine how far up you want the color to go later and bleach that far (say, six inches) in a single step, or you can determine how far up you want the color to go later and do the bleach as sort of an ombre. I prefer the ombre approach because the dye does eventually fade out and then the you’re left with something just a little more natural looking. If you want to go this route, and you’re going to dye, say, six inches, do your initial bleach application on only the bottom four inches, then go back and move up another inch ten minutes later, and then the final inch ten minutes after that (adjust distance and time to fit your desires and the particular bleach process you are using). Most bleach will list a processing window of something like “at least 20 but no more than 35 minutes,” or some such, and you want to pay attention to that and do not exceed the maximum time listed. If you check the foils and you’ve achieved what you want sooner, great! But bleach is not a “well I’ll just leave it on longer than they suggested because I want more lightening” product. Unless you enjoy hair that feels like straw and breaks off in your hand, that is.
When you’ve achieved desired lightness or time is up, follow the directions for rinsing out (do not shampoo). If you must color right away, you’ll need to dry the hair, first, but I strongly recommend bleaching one day and letting the hair rest before moving on to color. If you’re done for the day, gather hair into a high pony, slather the newly-bleached ends in coconut oil, and slip a plastic grocery bag over the pony and secure with another hair tie. Then sleep on it—give the oil time to really soak in.
Step 1.5: Trim, Baby, Trim
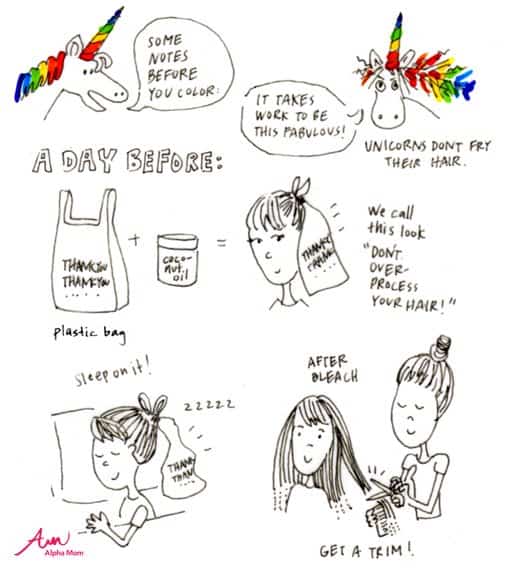
Did I mention that bleach is damaging, even when done properly? I like to do a haircut after the bleach but before the color. You can do this directly after bleaching or the next day or whenever, really, but there are lots of good reasons to do a trim prior to coloring. For one thing, it will remove the inevitable split ends and worst of the bleach damage. For another, why waste dye on hair you’re going to cut off? And finally, if you do any sort of layering, this ensures that you see exactly how the hair will lay prior to breaking out the color. If you cut your teen’s hair yourself, great, just have at it. If you are not comfortable playing hairdresser, remember that you’ll want to schedule a trim after the bleach.
Pro tip: Take this trim into consideration prior to bleaching. That is, if the hair in question is already either pretty damaged or much longer than desired, adjust your bleaching zone accordingly so that the remaining area after the cut is the size you desire.
Steps 2 & 3 : Prepare To Color
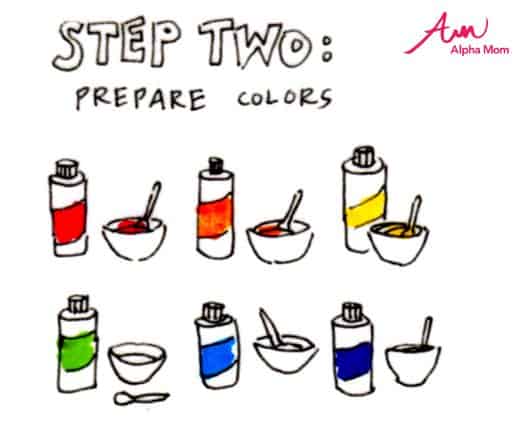
Set out your seven colors (our awesome illustration shows six, but we used seven) in order on the counter, not just because it makes a fun Instagram post, but because once you’re into the process you’re not going to want to stop and hunt for which color comes next. Trust me—put them in the desired dyeing order. If you’ll be mixing any colors, prepare them now and put them in the line-up with the others. Many people like bowls and brushes, here, but personally I find it easiest just to squeeze the bottles and rub in with my (gloved!) hands. When it came to the orange we mixed, I just scooped it out of the cup with my fingers.
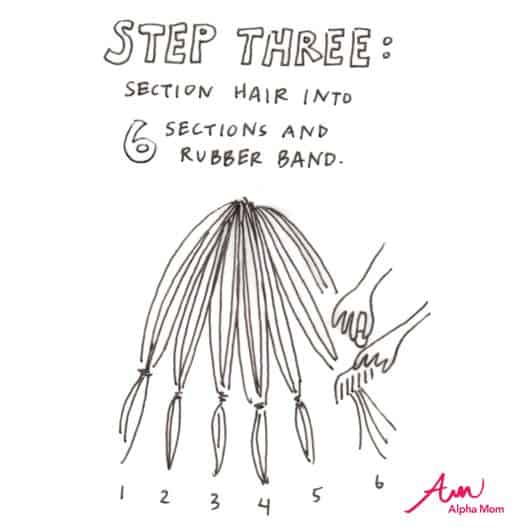
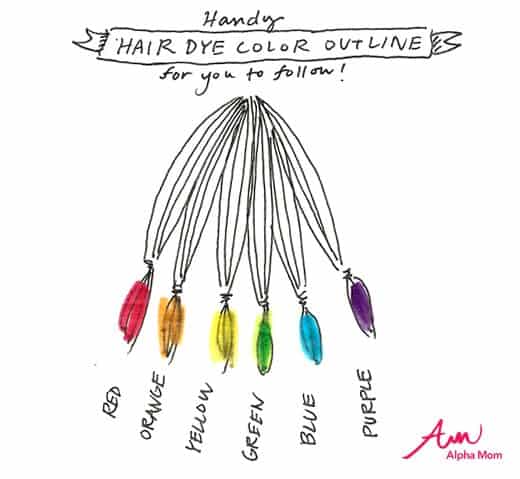
Hair should be dry (if you’re dyeing the day after the coconut treatment, wash with a mild shampoo the next morning to remove the oil), combed out, free of product, and parted wherever she usually wears it. The rainbow has seven colors, and we decided to do smaller sections so as to repeat the sequence rather than just one big section of each color—fourteen smaller sections in all. (Again, the illustration shows larger sections, and this is absolutely a matter of preference, so do what you like!) So: I divided her hair in half, down the back, and pinned one half out of the way. I took the remaining half and split it into half, then divided each of those halves into three smaller sections, with the two meeting in the middle a little larger than the rest. I then took the two larger middle sections and “borrowed” from them to make a third (I turned those two sections into three). And then I surveyed each of my now seven smaller sections and shuffled hair around a bit until I felt like they were all approximately the same thickness. This sounds much fussier than it is; I used the little rubber bands to hold the sections loosely as I went along, and if adjustment was needed, I just pulled the bands and rearranged. Once we were happy with the seven sections, I rubber banded them tightly, with the bands at the level we wanted to dye up to. Repeat with the other half of the hair (and marvel at how much faster it goes now that you’ve done it once).
Step 4: Dye, Dye, Dye
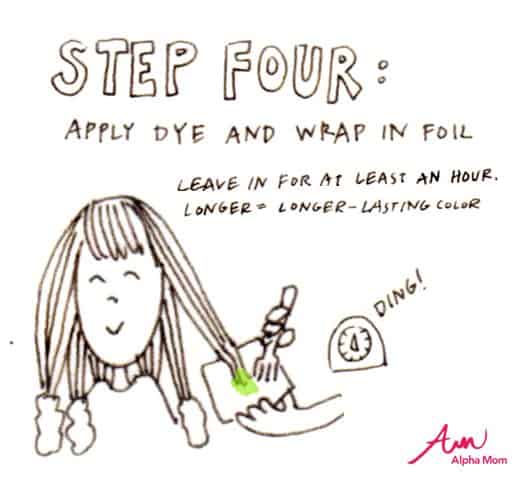
Once the hair is sectioned, you’re ready to color! This is where you make sure everyone is wearing old clothes, the floor is covered, your countertop has old towels on it, etc. (News flash: Dye stains!) Beginning at one side of the face, work your way around the head to the other side with the dyes, saturating each section up to the rubber band, then wrapping in foil. Because this part is about a lot of different colors, take your time and make sure each foil is as clean as possible on the outside to avoid transfer to other sections. Also: wash and dry your hands (gloves) after each section before moving on to a new color. I’m not going to lie; this part takes a while. Here’s the great news about this part, though: unlike bleach, this vegetable-based hair dye is non-caustic and even somewhat conditioning for the hair, so you can leave it on as long as you like with no fear of damage. The bottles say to leave it on for 20 minutes, but any funky-hair devotee will scoff at that. Plan to leave it on for at least an hour. We usually go 3-4 hours, time permitting.
Does your unicorn want to get up and move around once she’s all foiled? No problem—grab another plastic grocery bag, gather all the foiled ends and drop ’em into the bag, and secure with a hair tie.
Step 5: Rinse And Set
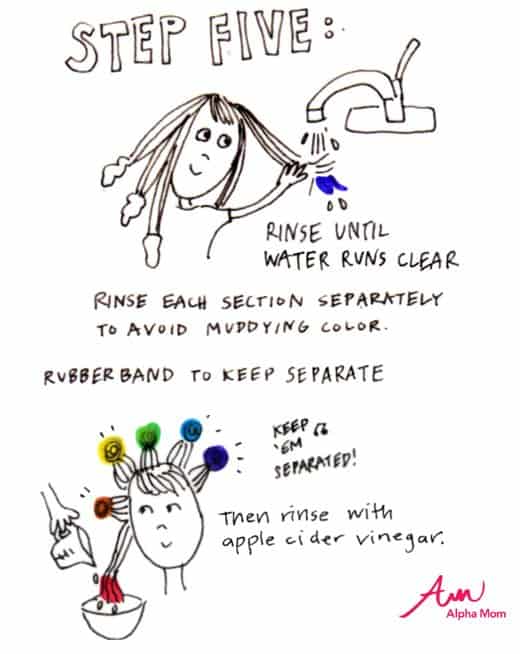
Unlike a single hair color, you can’t just head to the sink and scrub up, here. The freshly-colored hair is going to give off a lot of excess dye in rinsing, and you don’t want that dye getting on the undyed hair, or (worse) muddying the other colors. So! Older/taller teen unicorns can stand at the kitchen sink, head bent forward, and shorter teen unicorns can lie on the counter with the back of the head over the sink while you get to work.
Remove one foil and either carefully cut the little rubber band or gently pull it out while rinsing. Rinse the now-freed hair with cool water until squeezing it into your gloved hand yields only clear water with no tint. In general, you don’t want to shampoo after using these bright colors (you want to keep as much dye in the hair as possible for as long as possible), but some colors run more than others, so use your best judgment. For example, we found that the red/yellow/orange/pink colors could be rinsed with just water and run clear within a reasonable time frame, but yowza, the darker colors seem to run forever. Special Effects Deep Purple, in particular, turned the blond hair nearly black and then ran and ran and ran, so those sections we went ahead and shampooed during rinsing to expedite the process. For each section, rinse until the water runs clear (or shampoo until the water runs clear), squeeze out the excess water, and then dip the colored section into 50/50 mix of cool water and apple cider vinegar. This will help the color to set.
Once a section is rinsed/vinegared/squeezed out, clip it out of the way and grab another section. Repeat this process until all of the colored hair has been treated. We usually go ahead and do a quick rinse and vinegar rinse on the entire head of hair as a final step, just to make it easier to move on to adding product and styling without having to deal with half wet/half dry hair.
Step 6: Styling And Aftercare

Your unicorn is now ready to wow the world with whatever hair products and rituals she prefers, but do bear in mind that the treated hair may still be on the dry side from the bleaching (and thus will benefit from some TLC) and shampooing will result in a bit of color run for a while. So a few shifts in routine may be merited, here. Namely:
1) The overnight coconut oil soak is a great idea for hair that wants moisture, and it’s cheap and easy, so do it as often as you like. Just stick to the colored hair and keep it away from the scalp.
2) Plan to use old towels for a couple of weeks at least, and don’t go to bed with wet hair unless you’re okay with stained pillowcases.
3) Use a shampoo specially formulated for color-care, and shampoo as infrequently as you can get away with to make the color last. When your unicorn does shampoo, just scrub the scalp with a smallish amount of shampoo and rinse—don’t bother sudsing all the way down the hair (rinsing will bring the shampoo down, anyway).
That’s it! It’s a lot of work, but I hear that unicorns really do have more fun.
Illustrations by the amazing Brenda Ponnay