More Mother’s Day Photo Magnets!
So we’ve established that moms need magnets for Mother’s Day, right? How about some other magnet crafts? You can pretty much stick a magnet on anything and slap it on the fridge but here is something that might intrigue the little ones. How about a bubble diorama magnet? And to make it even more interesting what if we made it inside a slurpie drink lid! You needed an excuse to head to your favorite coffee shop for an iced drink right?
Do it for the kids!

The supplies you will need
• Slurpy drink or iced coffee dome lids
• card stock
• origami or scrapbook paper
• little face photos
• glue (a hot glue gun* is nifty but any quick-drying glue will do)
• toothpicks
• pencil
• scissors
• crayons or anything you might like to use to decorate a little scene

First you’ll need to create your scene. Do this by cutting a circle out of card stock that is just a smidge (1/4 inch) smaller than your dome lid. You can do this by tracing the lid and then cutting out your circle and trimming it down by a quarter inch or less.

You’ll need it to fit just into the lip of the lid like the photo above.

Now to create your scene: You can color a picture with crayons or markers or you can do like I did and create a layered diorama with cut-out shapes from origami or scrapbook paper. Just start with the object that is furthest away like the sky.

Then add shapes that look like mountains, working your way forwards with lower and lower shapes. To create a sense of distance you can put spacers between your layers.

I created spacers with small tabs of card stock folded like into a lightning bolt shape but you could also use those thick sticky round tabs or thick glue dots from your local craft store. You just want to create a tiny bit of space between each layer.

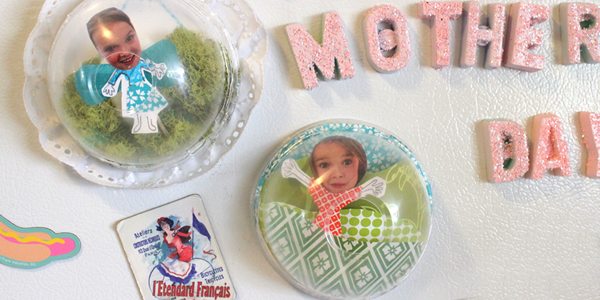
When the landscape was all glued in, I added a little body made out of an origami dress, some quickly drawn arms and a cut-out face attached to a toothpick and glued the whole she-bang behind the first hill.

Then I glued a fine bead of glue along the inner lip of the slurpie dome lid and dropped in my scene.

She’s trapped forever!

Then I added a magnet to the top of the back and voila! Genie in a bottle! I mean cute little bobble faced kid in a magnet!


My daughter opted to draw in her scene and add some decorative moss we had on hand as her landscape. Whatever way you do it, it will be fun to look at a little scene like this on your refrigerator.

Especially next to some letter magnets that say “HAPPY MOTHER’S DAY!”
******************
Difficulty Level: Medium (gluing can be tricky but coloring and assembly is great for all ages)
Appropriate Age levels: School Age and Up
*Remember glue-guns are for grown-ups who don’t cry if they burn their fingers.
More Mother’s Day crafts we think you’ll love:
- Handmade Jewelry Box for Mother’s Day
- Mother’s Day Magnets
- Glitter Stencil Votives for Mom on Mother’s Day