Handmade Jewelry Box for Mother’s Day
This year, 2025, Mother’s Day is Sunday, May 11th.
We’ve made lots of beads and baubles for Mother’s Day but we’ve never made mom or grandma a box to store those treasures. What could be more personal than a handmade jewelry box?

Supplies you will need:
- empty cigar box
- spray paint and/or acrylic paint (use outside in a well-ventilated area)
- velvet or fake velvet (velour)
- 1-inch cotton upholstery piping cording (found at your local fabric store in the home dec section)
- decorative flowers, gems, paper decals etc.
- fabric scissors (or very sharp scissors)
- cardboard
- white craft glue
- hot glue gun (to be used by responsible adults because hot glue burns)
- exacto knife or blade and a self-healing mat or cutting board
- metal straight edge or ruler
Let’s get started on making mom’s Jewelry Box!

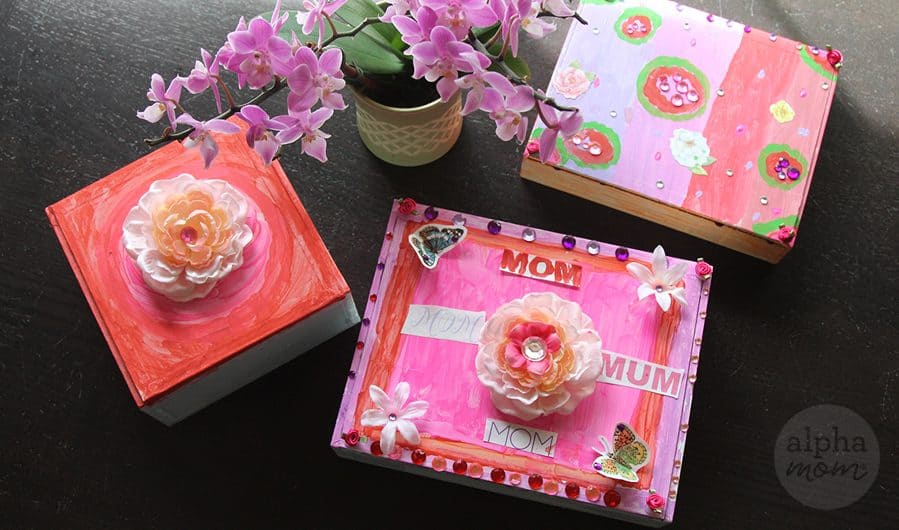
First, you will need an empty cigar box. You can usually get these for free or for a few bucks at a cigar shop or humidor. I’m always surprised at how pretty these boxes are and how cheap they are. You’ll be tempted to leave the boxes as they are with their ornate decorations but for this craft you’ll need to paint them white (or any color you like) so that they can be used as a blank canvas for personalizing.
Spray paint or paint your boxes on all sides. If you choose to spray paint, make sure to do so outside in a very well-ventilated area. You’ll probably need a couple coats to cover the box evenly. Then let them dry, making sure that the lids are fully functional and not glued shut with paint. If they do stick, just gently cut them lose with a blade or exacto knife.

Now you are ready to decorate!
We hosted a jewelry box decorating party at our house but you could do this all by yourself and have plenty of fun. We covered a table with craft paper and then set up a station with every kind of decorative item we could find: paint, silk flowers, scrapbook paper with pretty floral and butterfly designs, stickers, a printable with mom written all over it, gemstones, glue… you get the picture. It was a lot like our Valentine crafting party but with “mom” as our inspiration.
You can really go crazy with decorating the top of the jewelry box or just keep it simple with a pretty silk flower right in the middle. Of course, keep your mom in mind when you are decorating!

You can even decorate the inside with a mirror. Whatever you choose, we are sure mom is going to love it. And if you want to take this craft up a notch you could even line the inside with velvet and make a special ring divider section! See below for steps.

First, measure the bottom of your box. Then cut a piece of cardboard that is just a toucher smaller than that measurement. Next cut a piece of velvet (or velour–we’ll just say velvet from now on) that is roughly an inch bigger than your cardboard. Then cut out the corner squares of the velvet so you can fold the velvet edges over the cardboard without the corners bunching up. Run a line of hot glue along the edge of the cardboard and carefully fold the fabric over the glue to secure. Be especially careful of the hot glue during this step because it burns!
Once your jewelry box bottom is completed, insert it into the box. If you’re worried about it coming lose you can also glue it down with a quick dot of hot glue.
You can also make a small divider section at this point to contain your ring section rolls. Do this by measuring the distance across the box as well as the depth of the box, making sure to allow for the lid and any decoration you might have attached to the inside lid. Test your divider by closing the lid before you cover it or secure it.
Cover the divider section the by wrapping velvet around it. Overlap your seams on one side. That’s the side that will be attached to the ring rolls so it doesn’t matter if it’s not perfect.

Now you are ready to make your “ring section”!
The first time I tried to make a ring section I tried to use a glue gun and burned myself and made a big huge mess with my velour fabric. The next time I used double stick tape and it worked out so perfectly I don’t know why I never thought to make one of these before!
Cut your 1-inch cotton piping cord into sections about 2.5-3 inches long (or however long you want your ring section to be. You could fill in your whole box with ring rolls if your mom has a lot of rings). Cut as many as you need until the entire section is filled.
Measure how much velvet you’ll need to cover each ring section by wrapping your velvet around the piping cords. Make sure it’s wide enough and long enough to cover the entire ring. Don’t worry about the edges though because those will be tucked inside the box and won’t show. Just allow enough over to tuck.
Wrap each roll using a piece of double stick tape to secure the velvet to the piping cord section. I used a piece of tape to start and a piece to finish each section. Once you have all your rolls wrapped you can secure them to the bottom of your jewelry box with hot glue. Then cover the exposed ends with your covered divider section. Tuck everything in neatly and secure any lose pieces with hot glue.

Make sure everything is dry and secure and you remove any lose glue strings before you gift your mom the most personal jewelry box ever.
We hope your mom enjoys her box as much as we did making ours.
Here’s the video version of our Jewelry Box DIY:
Happy Mother’s Day!