Valentine’s Day Craft: Felt Flowers
I don’t know about you, but the Valentine’s Day aisle at all the stores makes me gag just a bit. Nothing says “I love you” like a stuffed gorilla made in China. Or a plastic heart filled with food coloring and chemicals. Delicious!

Perhaps I’m a bit cynical about a holiday perpetuated by greeting card companies who sell over a billion cards each year. Yes, perhaps. But it’s going to be a recycled Valentine’s Day around our house. So make a nice dinner for your sweetie, give the kids a handmade card, and get crafty. Instead of giving Hallmark a big wet kiss this year, make something from the heart.

Here’s a project for some flowers made with recycled materials that can be found around your house. I think these would be very sweet for teachers or grandparents. This project might work best for older kids, but I tried it with my young children and they enjoyed making a mess with paint and glue. Who doesn’t?
This project uses felted wool, which can be made by washing and drying 100% wool sweaters. I thought that the cut wire hangers might be too sharp for the kids, but they really weren’t. But you could always wrap a piece of clear tape around each end.


Supplies
-Felted sweater scraps
-Wire coat hangers
-Cereal or cracker box
-Green acrylic paint and brushes
-School glue
-Scissors
-Wire cutters
-Pliers
Directions
1. Cut cardboard from cereal box into leaf shapes and have kids paint the leaves with acrylic paint.
2. Cut felted sweater into circles (about 3″-4″) and smaller center shapes (about 2″-3″). Older kids can do this on their own, but felt is difficult for the smaller hands to cut.
3. With wire cutters, clip coat hangers for stems (around 8″). Just use the straight sides and bottom.
4. With pliers, bend down the tops of the hangers.
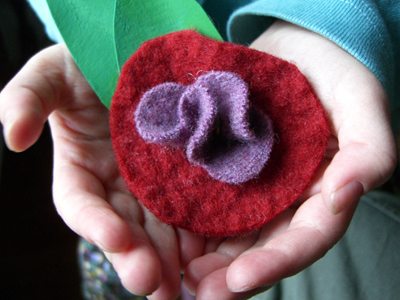
5. Fold larger circles into quarters and clip a tiny hole with scissors.
6. Poke smaller felt piece with the hanger to form a tiny hole. Have kids slide smaller felt piece onto the hanger stem. Then slide larger piece in place. Pull the smaller piece just slightly through the bottom, as pictured.
7. Glue flower pieces to one another.
8. With the end of the metal hanger, twist a small hole into one of the leaves and slide it onto the hanger underneath the flower. You will want this to be a tight fit as this will hold the flower in place. Repeat with another leaf and glue in place.
9. Cut edges to make scallops or create desired shape. Bend the leaves to make them more realistic.
All done! Now go give someone a flower that will never need water.
