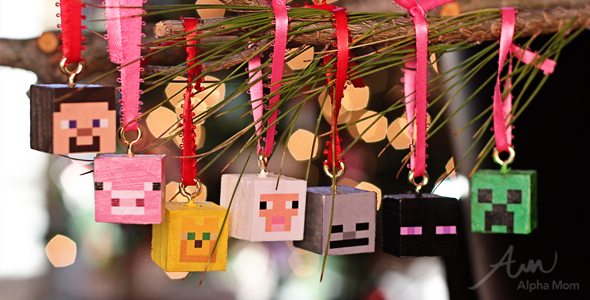
DIY Minecraft Christmas Ornaments
Minecraft is all the rage at my house and from what I hear, everyone else’s too! When my daughter suggested we make Minecraft Christmas Ornaments I knew I had to share her idea here.
Whether you’re making them as gifts, as an activity at a Minecraft-themed party, or just as ornaments for your own tree, they are sure to please every gamer big or small!

Click through for step-by-step instructions!
Supplies you will need:
- 1 inch wooden blocks (you can cut your own or buy them at a craft store)
- paint in Minecraft colors (my kids were experts at picking out just the right shades)
- eye-hooks (we chose gold, look for them where you buy picture framing supplies)
- Modge Podge or white craft glue that dries clear
- ribbon for tying
- our handy printout or use your own painting skills
If you are good with a paintbrush you can freestyle paint your own Minecraft characters on your wooden blocks, or you can be like us and download our handy printout (available for free below). Just cut them out and decoupage the faces on with white glue or Modge Podge.
Click here for our printable. (Bonus: it doubles as some really cool wrapping paper, you might want to print out a few!)
First sand down your blocks so the edges are smooth. You can drill small holes in the tops of your ornaments so that inserting the eye hooks is easier or you can muscle them in. I vote for the former. After your blocks are prepped with sandpaper and hooks, paint the whole block a solid color that corresponds to the character you are making. (i.e.: pig = pink, creeper = green, Steve = brown, etc.)
A handy tip for painting the bottom side is to create a little drying rack so you don’t have to wait before you set it down damp side on your table. You can do this by cutting out a 1-inch square of paper and inserting four push pins into the corner. Lay the pins down pointy side up and rest your wet block on the points. This way you can paint all the sides in one go.
When your paint is dry, apply some Modge Podge or white glue to the face side of your block (hook side up). Place your face paper onto the wet glue and then paint another thin layer over top of the paper. Paint the entire block with Modge Podge or glue so that all the sides dry consistently shiny. Let them dry again on your cute little DIY drying rack.
Now you’re ready to tie with a ribbon, and gift or hang on your tree!

This craft is also great as a playdate activity or during Minecraft-themed party. Just set up a table with all your supplies and let the kids go crazy. If you opt not to use our printable and paint in your own characters (maybe you want gold Steve and we didn’t make it for you, sorry!) You can download Minecraft pixel maps, they are found all over the internet.

Hope you enjoy and have an Epic Christmas!
Discover More Christmas Crafts on Alphamom:
- Super Easy Lollipop Advent Calendar Wreath
- Snowman Treat Bag Toppers
- Plastic Berry Baskets into Glittery Snowflakes