Homemade Felt Valentine Patches
This tutorial is a quick and easy way to make hand drawn, unique decals that can be ironed onto a felt backing and either sewn onto things or used as is to make a badge/button for Valentine’s Day.
You don’t need any special iron on transfer paper or a printer to do this. All you need are some plastic shopping bags, some permanent markers and some parchment paper (known as greaseproof paper for baking in the UK), plus the felt to iron them onto and unsurprisingly, an iron.
I have a stash of used plastic shopping bags kept in an old shoe box that we use for this, because we make many things other than just valentine’s patches with this technique. I keep a selection of plain white and any patterned or colored plastic bags that I find.

With younger kids you will have to cut the initial shape out for them, because cutting an even shape from thin plastic bags can be a little fiddly. I folded a section of plastic bag in half in order to cut out many symmetrical heart shapes for the kids to decorate. Make sure that the shape you cut out is smaller than your iron’s surface, because otherwise any protruding edges will shrivel up when you try to iron it on later.

Now the kids can just go to town with the Sharpie pens, decorating the hearts any way they choose. I had a few fine line permanent pens handy for them to write little messages, as well as the larger ones for coloring. I did this project with kids that were four, five and six years old and they all did a great job, despite the rather small canvases they were working on. This will likely appeal to older children too I’m sure, because I couldn’t help joining in and decorating a few myself.

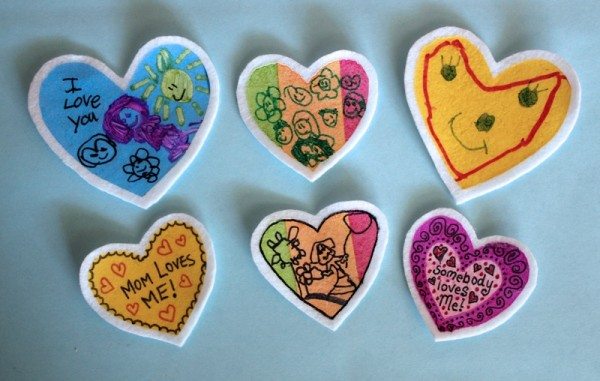
Here are three of the hearts decorated up before they were ironed onto the felt.

The next step is to iron the decals onto the felt base. I’ve ironed these directly onto clothing before now, but when trying this for the first time, felt is the easiest thing to make them adhere well to because it isn’t very textured and it doesn’t have any stretch to it. I just used a roll of cheap white synthetic felt that I picked up from Daiso. Make sure that your iron is set to cotton and NO STEAM and that you have a solid surface to iron on (I ironed with the felt directly on our tiled kitchen table). Then just place a single heart right side up onto the felt and put a small piece of parchment paper over it, so that the melting plastic bag doesn’t stick to your iron. Note: Parchment paper (used in baking), NOT wax paper.

Basically all you are doing is melting the plastic very quickly and evenly into the surface of the felt, so that when it cools it will not come off. You need to put the iron down firmly and evenly right onto the decal, covering the whole thing. Hold it with pressure for a few seconds without moving the iron. This will ensure that the plastic doesn’t shrivel up from the heat before it sticks to the felt. Once you have done that, you can move the iron around, making sure the edges of the decal are well adhered. Let it cool for a few seconds before peeling the parchment paper off. This guarantees that the plastic has set. It’s very very quick and easy to do, and we were able to set up a nice little production line with the kids decorating and me ironing and cutting. Here are the decals ironed onto the felt before being cut out.
When ironing plastic bags in this way, it is usually recommended to do it in a well ventilated space, so we opened the kitchen windows. Usually when people suggest this, they are talking about ironing together large sheets of plastic bags to make a tyvek type material, rather than just tiny pieces like we were, but to be on the cautious side we made sure the space was well ventilated.

In a very short amount of time you can create many of these cute little patches.

We left a little white felt border on our patches because I planned to sew them onto apparel such as coats, hats and backpacks etc, but you can just as easily cut them out without that extra border and hot glue a little extra felt on the back with a safety pin to make buttons/badges like this. We made valentine’s badges in this way for classroom gifts last year.

My girls wanted their patches sewn on their coats, so I used some embroidery floss and blanket stitched the patches down one arm.

Obviously you don’t have to limit yourself to a valentine’s theme with this technique. It’s a great way for my girls to make quick and easy personalized birthday badges for their friends, or make patches to sew onto tea towels or aprons or totes for grandparents. It’s nice to be able to get the children’s artwork onto items without having to use scanners, cameras, printers and expensive transfer paper! And each item is unique because it’s hand drawn.
The girls also wanted to sew one of the hearts onto a onesie for their little sister, even though she won’t get here for a few more months yet.

These patches will happily survive laundering in a cool wash if they have been adhered well in the ironing process, but a hot cycle in a tumble dryer is likely to damage them or cause them to start peeling off. Occasionally in the past I have found that some of the permanent pen colors may change with the heat of the iron, but happily none of ours did while we were doing this project.
Give it a try and before you know it, you’ll be hoarding plastic bags like we are!