Winter Craft: Waterless Snow Globes!
Snow globes are such a funny thing. They are meant to be shaken and yet so many of them are breakable and expensive and we’re always telling kids not to touch. That’s just cruel, I think. What if we made a snow globe that was meant to be shaken? What if it was a craft that kids could make themselves!?! Now that’s an idea!

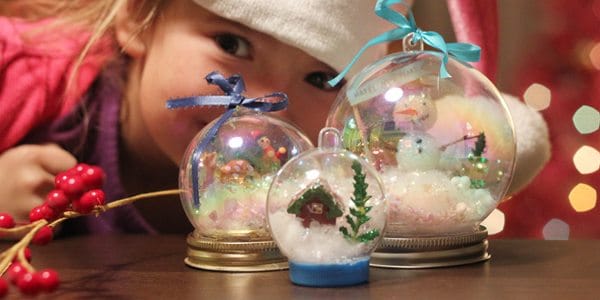
I present to you: Waterless Snow Globes. So easy to make, even a kid could do it!

First you’ll need to gather your supplies
1. clear plastic ornaments that snap apart
2. snow glitter
3. canning jar lids (size small) (milk caps will do for smaller ornaments)
4. cotton balls
5. small toys, ornaments or festive doodads
6. white glue or a hot glue gun (not for kids)
7. cardboard cut into 2-inch discs
8. decorative ribbon
Now it’s time for directions
On your round 2-inch cardboard disc you’ll create your snowy scene. First, put down a layer of glue. (White glue will do but you know me, I love my glue gun. Just make sure if you’re using a glue gun not to let little kids touch the hot glue.) Then pull apart a fluffy white cotton ball and firmly stick it down onto the glue. Now you’re ready for your toys.
A word about snow globe toys: It’s difficult to find vintage plastic reindeer these days. They used to be everywhere but due to toy manufacturer regulations it’s getting harder and harder to find small bits to put inside a snow globe. You can order them online in some places but you can also use mini ornaments—just cut off the hanging loop. Miniature trees from model train sets work well too. I found some winter garland and cut the top off of a glittered fern to look like a small tree. You can even make a small snowman like I did with some styrofoam balls and tiny sticks.
Once you’ve found your toys and glued them into your snowy scene, you’re ready to pop them into your plastic globes. It’s easiest to work with your globe if you set it into the canning lid that will eventually become your snow globe base. Don’t glue it yet though. Just use the base as a little stand until you have everything in place.
Take your cardboard disc (that has a snow scene on top of it) and gently put a line of glue around the back outside edge. This will attach to the back inside curve of one half of your open globe. Once that is nice and secure, add some glue to the bottom of your open globe and the bottom of your cardboard disc and then stuff some cotton under the disc in the remaining space. This will help your snow scene stay nice and secure when it’s getting shaken like a polaroid.
Now the fun part: Add your glitter snow! A pinch or two will do.

Let it snow, let it snow, let it snow!
Once everything is in place, close the globe with the other half and get ready to glue it to your canning lid base. Just apply the glue to the canning lid and then set your globe down in it, making sure your snow scene is nice and level.

Add some decorative ribbon to the top and you’re done!

Perfect for any mantle, shelf or little kid hands!

Go ahead and let them shake up a snowstorm or two!

It won’t break, it’s plastic!