How to Make Easy Paper Pumpkins

Pumpkins pumpkins everywhere!
How we love them this time of year!
On the hearth, upon the stair, at your doorstep, trick-or-treaters beware!
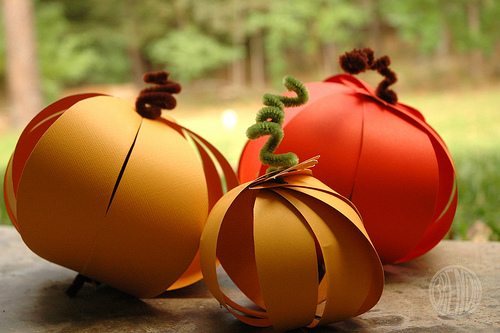
How about a paper pumpkin?
Have you made one yet?
It’s simple and quick and fun for kids!
Don’t believe me? Then go ask Sid!
Just kidding around. Silly poems aside, this is a really super easy and fun craft that would be great for decorating your house for fall. All you’ll need are a couple of square pieces of scrapbook paper in pumpkin colors, some scissors, a hole punch and some chenille stems (aka pipe cleaners) in fall colors.

If you don’t have scrapbook paper, any old paper will do. Just be sure that it is cut in a square.

Next you’ll need to fold it into triangles as shown above. How neatly you fold it is not terribly important. It’s not origami. You only need the fold lines as guides for where to cut. After you’ve folded it in half and then in half again and then in half yet again (3 times), then unfold it and cut along all the creases from the outside edge towards the middle but do not cut all the way through. You want to leave about an inch of uncut paper in the center. If you cut all the way through then you’ll just end up with pieces and not a pumpkin.
After your lines are cut, then cut from the outside corner toward the middle in an arc shape. This will create four split petals. If I’m not explaining this very well, here’s a handy-dandy printable for you to copy and use as a pattern. You can also just cut the petals while it’s still folded—sort of like how you’d cut a snowflake—but I’ll leave that to those who are more comfortable with paper crafting.

Punch each petal in the outside corner, and punch once in the middle. If your hole puncher can’t reach to the center just fold your paper and cut a small hole.

Now it’s time for assembly. This is a good time for younger kids who aren’t as handy with scissors and hole punchers to participate.

First thread your chenille stem up through the bottom and curl it so it doesn’t pull through. You’ll want your curl to be as flat as possible so your pumpkin can sit flat and not wobble too much to the side. Then thread the chenille stem through the holes in the tip of each petal until they’re all attached. Now you can cinch down the petals until they create a nice squatty globe shape. To hold this shape just bend your chenille stem into another spiral on top. You can create fun curly pumpkin stems by winding the leftover chenille stem around a pencil or pen.


Tah-dah! You’re all done.

Of course if you’re my daughter, your next step is to decorate your pumpkin with stickers and pink hearts but I realize that unlike her, not everyone thinks pink is a fall color.
