Homemade Spring Soap
It’s still a pandemic out there and you know what is fun to do during times of crisis? Make stuff. And, we like to make Soap! We’re almost on the other side now and when we get through this we will be so proud of how tough we have been so let’s get busy and get crafting! A day of crafting is a good day. Let’s make some soap!

This soap is really easy to make. It almost makes itself. If you can microwave a frozen burrito, you can make soap. All you need are a few supplies and a microwave!

Supplies you will need to make this Spring Soap:
- silicone loaf pan
- melt and pour glycerine soap (we used about 2.5 pounds)
- green bar soap
- cheese grater
- a bowl or container that can be used in the microwave
- plastic/ artificial flowers
- a knife or dough scraper
- toothpicks
- essential oil or scent (optional)

Let’s get started.
How to make Homemade Spring-themed Soap:
1. The first step to making this spring-themed soap is making the grass for the bottom of the soap bar. Grate about a cup (more or less) of your green bar soap into your microwaveable dish. Add about one-third of your melt-and-pour glycerine soap to the shavings. Microwave that on high for about 40 seconds, stir and continue to microwave in 30-second increments until all of your clear melt-and-pour soap has turned into a liquid. Don’t worry, the shavings from the bar soap will not melt. This is normal. They take a lot longer to melt with a double boiling system so we’ll leave that for another craft. This craft is all about ease.
If you like, this is a great time to add your scented oil or maybe shavings of dried lavender or even coffee grounds if you want your soap loaf to have a “dirt level” on the bottom. (Coffee grounds can work as a great exfoliator so don’t be afraid to use them.)

2. Stir your mixture and then carefully pour it into your silicone baking dish. It should fill the bottom third.
3. Let that cool a for few minutes but not too many, the next step is a lot easier when your mixture is half cooled but you can still stick a toothpick into it and it gives.

4. Next, cut your plastic flowers into short 1-2 inch snippets.
5. Using either a toothpick or the stem itself, “plant” your flowers into the green grass layer of the soap. Pretty fun right? Who knew gardening soap could be so easy! If the flowers fall or droop, wait a few more minutes for “the grass layer” to harden a bit.

6. Let your flowers chill for a few minutes. When “the grass layer” is mostly hard you can now pour on your clear “sky layer.” This is just as simple as microwaving the remainder of your clear melt-and-pour soap (maybe adding some scent if you like extra perfumed soap) and adding it to the top layer.
7. The next step is probably the most important step: let it cool. I like to let my “soap loaves” chill for a whole day. You can speed the process up by putting your soap in the refrigerator but this can sometimes make the soap less clear. So let it be.

8. The next day is the time to cut your soap. This step is very satisfying so enjoy it. You might even want to put your camera on film mode and make a story out of it! There is a whole ASMR crowd out there who is really into soap cutting. Who knew!
Flip your soap out of your silicone loaf dish onto a cutting surface. This is pretty easy because silicone and soap are easily separated. If your soap doesn’t pop out, you can peel the silicone dish inside out and reveal the soap that way. Just a note: A glass baking dish would never work this way. Take my word for it. Some hands being cut by a sharp knife learned that lesson. Silicone is the way to go.

Note: cutting soap can be a bit tricky. It’s difficult to cut it straight with a knife unless you have perfect surgeon-like knife skills and tremendous patience. I do not of course. It’s a bit easier to cut straight with a dough scraper because you can press down straight with your weight and control the angle a bit more. If you are really precise about your soap being cut in perfect bar shapes, you might want to make a wire cutter with a wood frame but that was way to much work for me.
 I say embrace the inevitable imperfections, that’s what makes homemade soap homemade! It’s made with imperfect love. I think if the bars are too perfect then it looks like something you could buy and what’s special about that.

Trim of the really wonky edges and you are ready to package! Don’t worry about wasting the extras, you can always remelt them and make new bars of soap. Just call the next mix “the daily special.” It won’t be as pretty but it still works!

Since I plan to gift my soap, I wrapped each bar in parchment paper (it really helps for handling without getting your hands sticky) onto which I printed some of my favorite poems. I think it will be fun for the gift recipients to have these poems. Some are about hand washing, some are just little bits of encouragement to help us get through these trying times. I like to think that maybe my friends will keep my parchment poetry. Maybe they will tape it to their bathroom mirror and read it while they are washing their hands for the required 30 seconds. I tried to find poems that I knew would take that long just for that reason.

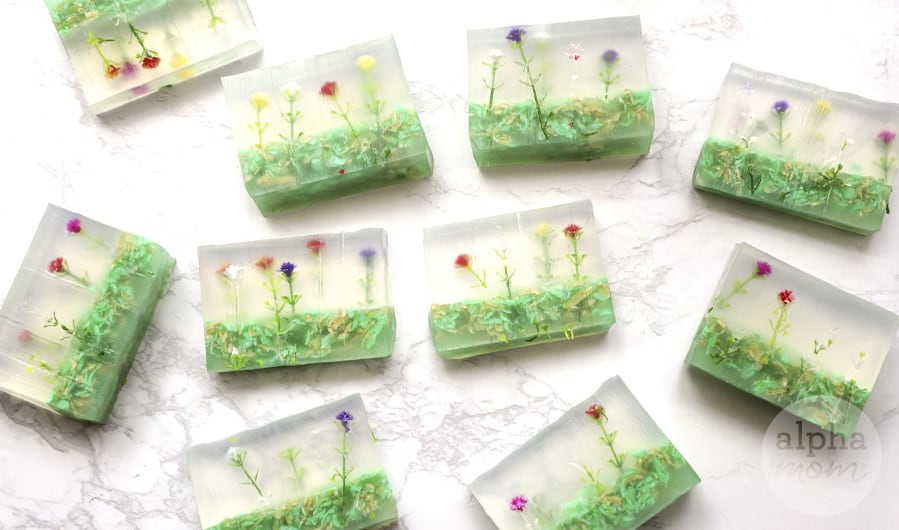
So pretty, right? These bars will make great mother’s day gifts and maybe even Christmas. Store them away, they will come in handy!
Happy Lathering!