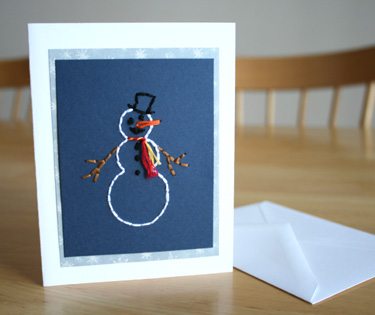
Snowman Greeting Card
This fun Snowman card is perfect for the cold Winter season. Using a punching awl and embroidery thread, this 3D card comes to life. It can be used to send with treats to a neighbor or friend, or even framed as a decoration. Here is the How-to for this fun Snowman Stitched Greeting Card.

Supplies: Everything is available at your local craft or fabric store.
* Punching Awl, or you can use a push pin too.
* Pattern for Snowman to punch and stitch: Download here, then print the pattern:Download file
* Cork board: For punching holes in card – found at kitchen or office store (try a cork hot plate)
* Thread: I usually use DMC floss, with all six strands
* Needle: Cross-stitch needle #26 for 18-22 count fabric
* Cardstock: white piece, accent color piece, folded card piece
* Envelope: white envelope that measures, 4 ½ “ x 5 ¾ “
* Glue: Glue stick, glue dots, spray glue is recommended for long lasting
Paper: cut a small piece of card stock paper, about 3 1/4 by 4 1/4 inches. This will be the paper you punch & stitch. Then cut a slightly bigger piece of paper that will be the accent piece, about 3 3/4 by 4 3/4. You will also want a folded card, measuring 4 1/4 by 5 1/2 when folded.

Punching: get out your “awl” and “cork board” and small paper and pattern. Then line up the pattern over the small paper. Punch through the holes, through both the pattern and paper.

Stitching: Thread your needle, using all 6 strands of the color of your choice, preferably white for a snowman. Then tie a knot at one end at the back and begin to stitch through each hole. Don’t skip any holes. You can go back if you need to. It doesn’t matter if the back is messy, most times it doesn’t show through. Then tie a second knot at the back when you are done with that color.

For the black coal buttons, I’m using a french-knot stitch, but with two holes. It just makes for a cleaner looking knot. I did this with the eyes, mouth, and buttons.


You could be finished here, but I wanted to add a scarf. For the scarf, I put the knot with a long thread end on the front side. I did this with two colors, separately, then twisted my second thread around the first for a fun scarf look.

Gluing: When the stitching is complete, center and glue the stitched piece to the color accent piece. Then center and glue the two glued pieces to the front of the folded card. The card is ready for an envelope. Here is the heavy duty spray glue I use. Try to spray the glue on newspaper outside or in the garage. OR glue dots do great for these too, and are a lot easier.

You’re Done! Have fun stitching cards. I’m sure you could try your hand at some snowflakes or a football this Winter season. Try drawing it free hand, print an image off the computer, or visit my blog Make and Takes for other Stitched Card Patterns. Happy Stitching!