Holiday DIY: Gumdrop Ornaments
 Yesterday was a snow day. It snowed a lot on Sunday, I’ll give the school that. But there are also plows and salt trucks who worked very very hard to clear the roads. All their hard work went to waste though, because they still canceled school. I expect the Superintendent to apologize to the DPW workers for wasting all their hard work. While they’re at it, they can apologize to me too. I will think about accepting.
Since it was a snow day I decided to make gumdrop ornaments with my kids. They’re colorful and easy to assemble, and they don’t require any complicated supplies. Perfect.
What You’ll Need
Styrofoam balls: I bought two sizes of balls, one large and the other small. Max pouted at the craft store because I wouldn’t buy an extra one to play catch with. I’m a pretty mean woman, you know, because I thought that since we have 14 balls in assorted sizes all over this house, there was no need to buy an extra styrofoam ball to throw around.
Glue gun or toothpicks: I didn’t want to use hot glue because that’s a mess and hard for elementary school-aged kids to control so I decided to use toothpicks to secure my gumdrops. You can do either, depending on how old your kids are and how concerned you are about someone singeing their fingerprints off. The toothpicks were a little trickier than I expected them to be, but everyone still had fingerprints when we were done so I guess that’s good.
Ribbon or wire: To hang the finished ball from the tree.
Gumdrops: You probably want to buy extra because the kids will eat them. Trust me.
Let’s Make Some Ornaments!
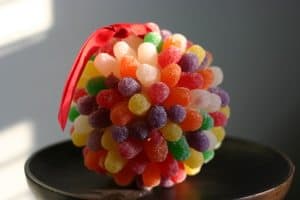
 1. Make a hanger for your ornament. Allison from Dream Bigger attaches a ribbon to the styrofoam ball with a straight pin and a little hot glue and then uses this to hang it when she’s done. I honestly forgot about the hanger for the first set of ornaments we made (oops). For the next ones, I made a hook by wrapping the smaller balls with two pieces of wire twisted together at the top, although if I had it to do over, I would wrap a ribbon around the ball before I stuck all the gum drops on it, tying it at the top with a loop and a bow. I attached my ribbon to the wire at the end and it worked, but didn’t look as nice as it could have. Learn from my mistake.
2. Attach the gumdrops to the ball. You can glue them on with the hot glue gun, or — if you’re working with smaller kids — you can attach them with toothpicks. Here’s a trick for you: Sticking a whole toothpick into the styrofoam ball doesn’t work (you can’t get the gumdrops close enough to the surface of the ball). Instead, I broke the toothpicks in half and speared a gumdrop with each one. The kids pushed the toothpick into the ball by pushing on the gumdrop — super easy.
 3. Hang the finished ornaments on the tree. Or pile them in a bowl or vase. Either way, they’re pretty. (The smaller balls are best for hanging — ornaments made with the larger balls are too heavy for the tree. But they look great on the table, so it’s still worth doing.)
Last thought: The mess from this project was pretty minimal. Lots of sugar on the floor and table but easy to be swept away. And you might want to put the balls up where they are out of reach of pets and kids, both of whom are likely to see them as pretty snacks.