How to Make a Suncatcher with Fall Leaves {Craft with Kids}
Autumn is here and that means fall-themed crafts for me (which I LOVE)! Nothing could embody fall more than a golden-hour fall-leaf suncatcher.
Leaves are pretty all on their own but if you live in a seasonally-challenged climate like I do (Southern California), you might need to help nature along with some festive decorations. In this craft idea, we make a tissue-paper suncatchers from fall leaves that glitters in the sun.

Supplies needed to make this Fall-themed Suncatcher:
- fall leaves (Just before they turn brittle is best. If you don’t have any, you can always buy some from your local florist.)
- tissue paper in autumnal colors (orange, yellow, and red)
- bendable wire (we used floral wire)
- modge-podge or white clear-drying craft glue
- pretty beads in translucent fall colors
- gold glitter dust
- wire cutters (use with care and please have a responsible adult crafter use)
- scissors
- a wide paintbrush
- parchment paper or wax paper
- cookie sheet

Let’s get started!
How to make this Fall-themed Suncatcher:
Step 1: cut out 10 or more circles from your tissue paper. We made our circles about 8-inches in diameter but you could go bigger or smaller if you like. You can use a bowl to help you trace a circle or free-hand it.
Step 2: set up your workspace: Set your parchment paper on your cookie sheet. This will protect your table or counter from excess glitter (which there will probably be a lot of if you like sparkle, as we do) and glue.
Step 3: carefully cut lengths of wire about 20 inches long or so. This step is best done by an adult. Make your wire lengths long enough to loop around the tissue shape and dangle below a good 3-5 inches. These wires will help give your tissue paper shape structure AND will be what you attach your beads and leaves to later.
Step 4: Bend your wires and begin to create your shape. Don’t worry too much about them not laying flat. Wire has a mind of its own and will bend this way and that way. You can fix the shape later once your tissue paper layers are down with some glue to hold them in place.

Step 5: Now it’s time to paint down the tissue and wire with modge-podge (or glue)! Paint a layer of modge-podge on your tissue paper circle with wires on top. Then lay another circle of tissue paper on top of the wires and paint it down also. Don’t use too much glue and make a soggy mess but do use enough so that the next layer will stick to it. Do this until you have used up all of your circles. When you get to the last layer, you can add a leaf and paint that down with glue too. Feel free to add glitter to the top of your last circle with the leaf.

Step 6: Next, string your beads onto your dangling wires. Add as many or as few as you like.

Step 7: Then attach a leaf to the bottom of each wire. You can poke the wire in and out of each leaf like you are sewing and then bend the end of the wire inwards so it’s not poking out. Be careful of the pokey ends.

Step 8: Once your leaves are attached you can paint them with modge podge and add glitter to them, too. Glitter everything up!
In fact, we had so much fun glittering we had to go outside and find more leaves to glitter just for fun and use up the time while our modge podge dried.

So pretty, right? These leaves are not part of our suncatcher but we think they will look really pretty as Thanksgiving place settings or gift tags for the holiday presents, or even just saved forever in a treasure box.

Who needs jewelry when you have leaves and gold dust?!

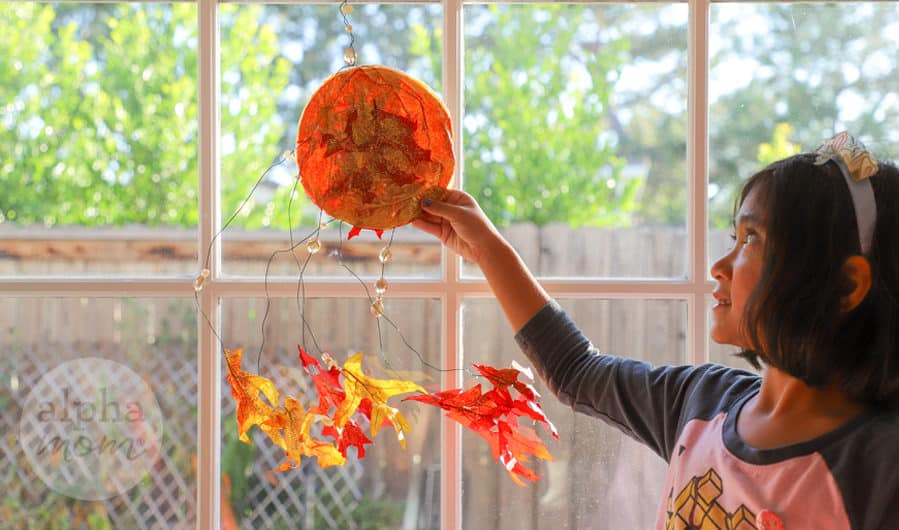
When all the modge podge has dried, you will have a pliable sun catcher that you can hang.
Step 9: We forgot to add something to hang it from but it was really easy to poke another short wire into the top (making sure to catch one of the other wires with that poke so it doesn’t just rip through the tissue when it’s hung) and make a small loop for hanging. We even added beads to that part too.

Then what is really cool about this suncatcher is that you can maneuver the dangling wires this way and that way to make a pretty arrangement. If you want it to look like the wind is blowing them you can bend them all to one side even.

Now for the fun part: where to hang it! In the window where it catches the light or on an otherwise boring plain wall to add some festive decor? It looks good everywhere!

But of course, we are partial to the window.
If you enjoyed this fall craft you might also like an epoxy version I made over on my blog that isn’t quite as child-friendly but very fun nevertheless!
More Easy Fall Crafts from Alpha Mom:
1. Fall Harvest Lunch Box for School
2. Best Apple Cupcakes (with cinnamon frosting)
3. Simple Fall Leaf Crafts for Kids