Roasted Butterfly Chicken
There are three tricks to being able to roast a whole chicken well: butterfly (also known as spatchcock), dry brine and using a thermometer. It may sound complicated but it is simple and easy and yields the best results! Click here for a video showing how to butterfly a chicken for Step 1 below.
Ingredients
Scale
- 1 whole chicken
- 2 tablespoons olive or canola oil
- 1/2 tablespoon pepper
- 1 tablespoon dried thyme
- 1 tablespoon dried sage
- 1 tablespoon dried parsley
- 2 tablespoons salt
- 4 carrots, cut into large pieces (optional)
- 1 onion, quartered (optional)
- 4 stalks celery, cut into large pieces (optional)
Instructions
- To butterfly/spatchcock the chicken: unwrap a whole chicken and place on a large rimmed plate or rimmed baking sheet. Place bird breast side down (you’ll be able to see the wings well). Using kitchen scissors, cut out the backbone by cutting along both sides of the backbone, cutting right through the bones. Throw away backbone or save to make chicken stock (another post for another day!). You have to be forceful and should have an adult help you cut out the backbone. Click on the link in the recipe summary above for a video showing how to butterfly a chicken. Alternatively, you can ask the butcher at your grocery store to cut out the backbone for you – just ask them to keep the rest of the chicken intact.
- To dry brine the chicken: Lay the chicken breast side up (now you’ll be able to see the legs better than the wings) on the rimmed plate or baking sheet. Press firmly straight down on the breast bone to flatten out the bird. Wash hands well then sprinkle generously with salt, coating the entire bird well with a nice thick layer. Place chicken in the fridge and let sit for at least 1 hour and up to 24 hours. (I usually do this in the morning and then roast the chicken in the evening.)
- About an hour before you plan to cook the chicken, remove the chicken from the fridge and let sit at room temperature. (If you forget to do this, that is fine…the chicken will just take a little longer to cook.)
- Preheat oven to 400ºF.
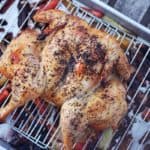
- Place a rack on a rimmed baking sheet, then lay the chicken on the rack. (I use two cookie cooling racks that fit into my baking sheets.) Brush oil all over chicken and then sprinkle evenly with parsley, sage, thyme and pepper (measurements for the oil, herbs and pepper above are approximate, adjust if necessary). Once you’ve sprinkled the pepper and herbs on the chicken, kind of rub them into the oil a little bit with your hands, then wash your hands well! If you want to make an au jus or gravy from the drippings (another post for another day!), place some aromatics (carrots, onion and celery) under the rack before putting the chicken on the rack. It’s best to try to keep the aromatics directly under the bird so they don’t burn as the chicken roasts. (Note: the carrots will be delicious after the chicken roasts!)
- Place in chicken preheated oven and bake for about 1 hour, until chicken breast temperature reaches 150ºF. I use an oven-safe instant-read thermometer, placing it in the thickest part of the chicken breast. I set my thermometer for 150ºF and just wait until the alarm goes off. That’s when you know it is done! Also, as the chicken is roasting, if any parts of the skin are getting too dark, cover the chicken with some foil. If you remember to take the chicken out of the fridge an our before cooking you will most likely not need to do this.
- Remove chicken from oven and let sit for at least 10 minutes before cutting. Enjoy!