Bento Box Basics for Back-to-School
Our Guest Contributor is Wendy Copley of Wendolonia.
When my oldest son entered preschool and I had to start packing him a lunch, I was terror-struck. Up to that point his daycare had fed him his lunches. Sure, I made his lunches on the weekend, but I usually just heated up leftovers or fixed him a bowl of mac and cheese. Now I was faced with filling a lunch box for him every day.
A lunch box full of cold foods.
A lunch box full of cold foods he would be willing to put in his picky three-year-old mouth.
My mind boggled.
But rather than panic, I did what I do in all times of crisis: I started searching the internet. And as I investigated packed lunches I stumbled upon the fabulous world of bento lunches.
What the heck is bento, you ask? The simplest definition of bento is that it is the Japanese word for a boxed lunch. But if I were to expand the definition a bit further I’d also say a lunch that is packed bento-style contains a variety of different types of foods: carbs, protein, fruits, veggies and sometimes a small treat. The foods are selected to provide a balance of colors, flavors and textures.
That sounds boring, you say. That sounds like a lot of boring work.
Ahhhh, but there’s where you’re wrong! The fun part of bentos is that they are meant to be cute. And that cuteness delights picky little kids. At least it delights my picky little kids. Your mileage may vary.
Some people go all out when they’re packing a bento box. They make exquisite food art that looks like cartoon characters, animals, or even scenes from movies. I am not one of those people. These lunches are lovely but they’re not something your average parent is going to throw together on a Tuesday morning. I speak from experience here: I love packing bentos for my kids, but between wrangling my toddler and begging my 1st grader to please please! put his shoes on, I don’t have a lot of extra time to spend making their lunches into masterpieces. I have to feed my kids lunch every day though they insist on eating — so I’ve got a few tricks up my sleeve that allow all of us to have a little fun with their meals.
What you’ll need to start packing bento lunches:
Don’t worry! You don’t need a bunch of expensive stuff to get started. Here are the basics:

- A box — The most important piece of equipment you’ll need to pack bento lunches is some sort of box to put your food in. Specialty shops and online store sell dozens of different types of boxes that are designed specifically for bento meals. These boxes come in a variety of colors and shapes and range in price from about $2.00 for plastic boxes with hinged lids to $50 for fancy thermal lunch sets. If you can find bento boxes (which is sometimes a tall order) they’re an easy way to go, but you can also use other types of containers with no trouble. For a child’s lunch box, I recommend a container that is roughly 4 x 6 inches wide and about an inch and a half deep. That may seem small, but this size will allow you pack the box tightly and fill it right up to the rim which will keep the food from moving around and mixing together when it’s in transit.
- Silicon baking cups — I use silicon baking cups just about every time I pack a bento. They are great for keeping wet things away from dry things and corralling small items like peas or berries. They also add a splash of color for a more cheerful presentation.
- A knife — A regular kitchen knife will go a long way toward sprucing up your lunch. Use it for cutting sandwiches into strips, dicing fruit or cutting veggies into matchstick shapes.
- Cookie cutters — Investing in a few versatile cookie cutters will allow you to easily add a little bit of cute to your lunches. I tend to use smaller cutters in basic shapes like circles, stars and flowers most frequently, but it’s also nice to have some larger cutters around for sandwiches. If you have kids in the house, you probably already have cookie cutters in a cupboard somewhere that would be perfect for bentos.
Techniques for adding some “cute” to your lunches:
So exactly how do you go about making fruits, veggies and sandwiches cute? Here are a couple of quick and easy techniques:
Neat and Tidy

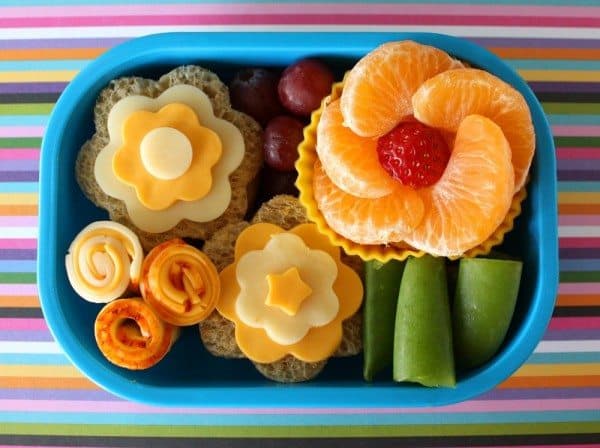
One of the fastest, easiest ways to make the food in a lunch box look nice is to stack foods, line them up, or just generally give them some kind of order. Compare the two piles of carrots in the photo above. The crazy pile on the left is fine, but the neat little stack on the right is kind of adorable. Or at least as adorable as carrots can be….

You don’t have to line up every single piece of food in the lunch box though. For the fruit cup above, I dumped a hand full of clementine wedges willy nilly in the bottom of the cup, then arranged the top layer in a circle pattern.
Cut shapes

Another quick technique is to cut something anything into a shape with a cookie cutter. Kids go absolutely bananas for this. I like to make mini-sandwiches, then cut extra cheese, meat or veggies into even more shapes and layer them on top. I’ve also been known to cut fruit leather, tofu, carrot coins and red bell peppers into animal shapes.
What do we do with all leftover scraps? We don’t throw them away, if you were worried about that. We usually just eat them along with our breakfasts.
Roll-ups

Sometimes my kids go through phases where they are totally opposed to sandwiches so when that happens I make them little roll-ups. Cut a piece of thin sliced deli meat into strips that are about as wide as your bento box is deep. Layer them with similarly sized strips of cheese and then roll them up. Put them in the lunch box with a stack of whole wheat crackers and your kids can feast on cheese and crackers.
Pack it in
Now it’s time to put it all in the box. The most important thing to remember when you’re packing a bento is that you need to fill the box completely. If you don’t pack the food in snugly and right up to the top rim of the box, everything will mix together and the little bit of extra time you spent to make the lunch cute will have been wasted. If there’s no extra space in the box the food won’t have anywhere to go when the box is tilted and everything will stay where it belongs. I usually pack the main components into the box and then look for any extra spaces. If I find any, I plug them up with smaller little bites. Grapes, cubes of cheese, berries and cherry tomatoes are wonderful for filling these little gaps.
Once everything is in place, show it to your kid and bask in her smiles! Or quietly pack it in her lunch box and let her have a nice little surprise at lunch time.
Or you could just save it for yourself. Shhhhhh!

Wendy Copley lives in the San Francisco Bay area with her husband and two young sons. She writes about cooking, crafts, parenting and her obsession with lunch boxes at Wendolonia.