Ukrainian Easter Egg Wall Decorations
We’ve been admiring those Ukrainian dyed eggs, called Pysanky for quite some time. They are amazingly beautiful and delicate wax resist artworks, that look like they would be very fun for an adult to attempt or an older child, but probably utterly frustrating, too fiddly, or downright impossible for the younger kids, so I thought we’d try making Ukrainian Easter Egg Wall Decorations — a more simple craft that mimicked the technique, but with more simple tools and on a much larger scale.

Supplies to make Easter Craft:
All we used were food colorings, white card and some clear wax crayons. I’m pretty sure that you could use water color paints or white wax crayons or even draw the resist part with a white candle too depending on what you have handy. The card we used was actually watercolor paper, which is quite thick. I think you need something thick like that because you have to paint on several layers of color wash to make these eggs, so you don’t want the paper falling apart if it’s too thin.
How-to instructions to make Ukrainian Easter Egg Wall craft:
I started out by drawing and cutting out a big Easter egg shape for us to use as a template. We drew around this template to make an egg shape on our pieces of card.

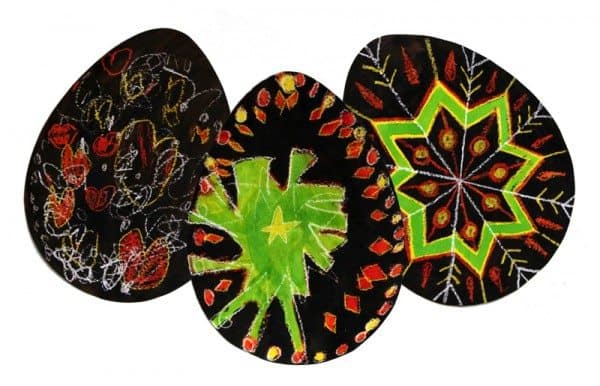
Then we drew some lines/patterns/scribbles with the white wax crayon and washed over the whole egg shape with watered down yellow food coloring. This gave a nice wax resist effect rather like batik does on cloth.

You could just leave your papers to dry and go do something else, but the kids just wanted to do the next color straight away, so I got out the hair dryer and we dried the yellow wash within a minute with that. Once it was dry we drew more patterns with the white crayon onto our eggs. Anything you draw on now will remain yellow when you paint on the red and green colorings.

Another round with the hair dryer and another layer of drawing with the crayon before the final wash of black food coloring. Anything that you want to remain red or green you have to draw over with the crayon this time. You don’t have to use the same colors that we used of course. Any colors you have that can layer up well will work fine, but the black really does give a dramatic effect as the final wash and the colors we used were traditional ones for pysanky.

When we’d dried off the black wash, I put a sheet of kitchen towel over the eggs and ironed them so that any lumpy bits of wax from the crayon would melt and we traced around the egg template again with a pencil so that we could see where exactly to cut out the egg shape.

The wax resist effect with the color washes gives a really interesting texture that looks almost like a chalkboard effect. Very pretty!

My six year old had a go with the red and green washes, but my five year old decided to keep it simple with just the red wash on hers.

They make quite beautiful and durable Easter decorations hung up on our door.
