How to Make Snow-Globe Soap
What’s cuter than a button, small enough to fit in a stocking, won’t rot your teeth, and leaves you squeaky clean? A mini snow-globe soap, of course! Here’s a super-fun craft you can whip up in an afternoon. It’s quick, it’s easy and it hardly makes any mess! I’d say it’s just about as easy as making a batch of homemade popsicles except you get to melt things in the microwave. We show you how to make snow-globe soap.
Stuff their stockings with something they can wash their hands with!

Supplies for your soap craft:
First, you’ll need some wee little toys, small enough to fit inside an ice-cube tray. I found some tiny plastic reindeer, some snowflake-shaped buttons, and a few mini ornaments that did the trick. I meant to find some of those cute little plastic snowmen that bakeries sometimes stick in holiday cupcakes but I never managed to run any of those down. Really anything that strikes your fancy and will fit into the ice cube tray will work for your mini snow-globe soap.
Next, you’ll need to run to your nearest craft store for a brick of clear glycerine, some soap dye in blue, some soap scent (I chose peppermint because that’s what Christmas smells like to me), and some soap glitter. From your kitchen, you’ll need the microwave, a dish to melt and pour things in (my Fiestaware gravy boat worked marvelously but a glass measuring cup would be fine too), a potato peeler, a cheese grater, and a spoon for stirring. You’ll also need a bar of white soap.

This is technically just “melt and pour” soap so it might be considered cheating to some hard-core soap enthusiasts but I’m not about to mess with lye or distilling vodka when I’ve got a small child acting as my personal assistant. Melt and pour is plenty homemade by our standards. Especially since I get to choose what shape the soap takes and what fun toys I put inside them.

How to make Snow-Globe Soap Instructions:
First, you’ll cut up the glycerine into 1-inch chunks. Then microwave them on high for about 40 seconds. After that, microwave in 10-second intervals (stirring in between) until your soap is a nice gloppy liquid.
After your soap is melted you can add your blue dye, scent, and glitter. I added two drops of blue to get this winter sky color. Just like food-coloring, it’s always best to err on the not-putting-enough-color-in side than the oh-no-I’ve-put-too-much side. You can always add more dye. Much harder to get it out.

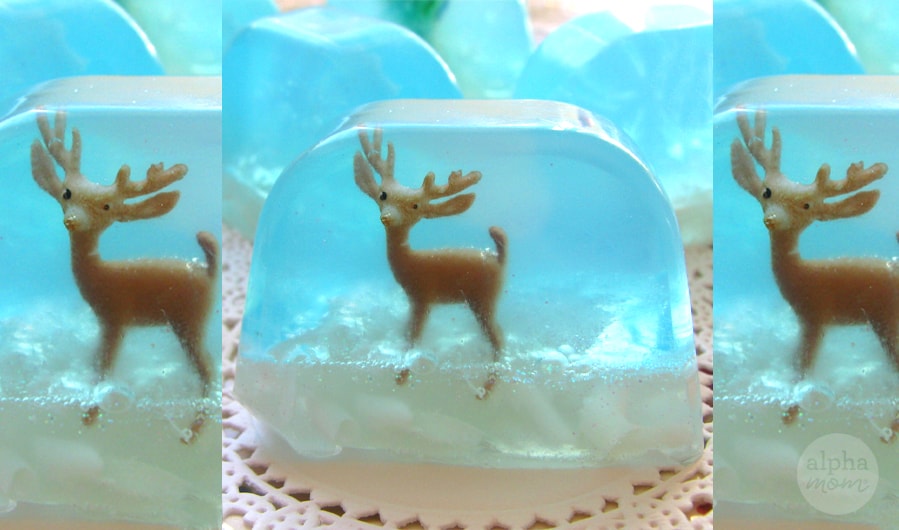
Don’t be fooled by the picture above. It might look like ice cubes floating in Antarctica but it is actually very hot. Not as hot as you might think though. I was afraid that this project would be too dangerous for my nearly-three-year-old but the soap actually cools quite quickly and as long as I kept her away from me while I was pouring, she was perfectly fine. In fact, she helped me choose which toys to put in each ice cube block and she added the snow curls that would later become the snow globe floor. But I’m getting ahead of myself.
Pour your glycerin mixture into each section of the ice cube tray leaving about a quarter-inch at the top. You will need this space later to add the snow floor and another layer of glycerine to seal the snow floor to the rest of the globe.

After you’ve poured the glycerine, let it cool just enough to form a thin skin on the top. It doesn’t take long. Maybe a minute, maybe a few seconds. I didn’t time it. I was too busy grating my snow to really pay attention. Then situate your toy in each ice cube block by poking it with a toothpick or pin. As it hardens it will be easier to manipulate so your toy is standing up straight and not floating dead at the top. Just make sure they are upside down because the “top” will be the “bottom” when you are done.

After all your toys are arranged, you can add your snow. We made our soap snow by peeling off curls from a regular bar of white bath soap. I also made some smaller snow shavings by grating it with a cheese grater. Soap is really easy to manipulate. I expect kids of all ages will get a kick out of this part.
When you sprinkle the snow on top, make sure to leave spaces that you can later fill in with a cap of glycerine. I made the mistake of packing the snow a little too tightly on a few of my cubes and they later fell apart because the snow shavings were not melted and there was nothing to hold them to the top part of the snow globe. Of course, you could melt opaque white soap instead of using curls for snow but I sort of liked my shavings. They look really pretty in the end. Once you’ve added the snow shavings, top each cube off with a little more glycerine.
Next you’ll pop it in the freezer for about twenty minutes or until the cubes are cool to touch from the underside of the ice cube tray (be sure to check the middle). Then you just up-end them like you would ice cubes and your little wee snow globes will be sitting pretty, all ready to be packaged!

I used a small paring knife to shave off some of the irregularities on the bottom but that was purely aesthetic. Once you wrap them, they look almost good enough to eat. Which reminds me, make sure your kids know that these are not candy. Unless of course, you want to teach them a lesson about what happens when they say naughty words but that’s another blog post for a different website.
You can wrap these any old way you want, but I chose clear cling wrap because I wanted my cool little glistening gems to show through the wrapping. I printed up some homemade labels and tied them up with string. Now they will be perfect for mailing off to those distant relatives, stashing inside of stockings, and saving for that bath time that needs a little something special.

