Happy Norooz “Fish” Bowls!
I’ve been learning a lot about Norooz (or Nowruz) lately, the Persian New Year that celebrates the Spring Equinox. This year it falls on March 21st, but sometimes it’s on the 19th or the 20st of March, depending on the lunar calendar. It’s a very festive holiday full of fun traditions like decorating eggs and going on picnics.
A very important part of Norooz is the Haft-Seen. This is a small table, usually decorated in a Spring theme. It is set with several items that are carefully chosen to symbolize spring and hopes for the new year. One of these items is a bowl of goldfish, symbolizing life. I was immediately drawn to this item because who doesn’t love a bowl of goldfish! So I decided to make my own version as a craft!

Here above, they are without water. Below, you’ll see them filled with water and glitter, which doubles as a really cool calming jar for kids.
Supplies for Norooz Fish Bowls craft
1. small jars (from used pickles, pimento, babyfood, olives…check your pantry!)
2. polymer clay in orange
3. beads for bottom of the fishbowl (optional)
4. a needle and thread
5. silk flowers (optional)
6. toothpick
7. hot glue*
8. glitter glue (if you opt to make the glittery water version)
9. blue food coloring (optional)
10. paint for the jar lids (optional)
Step 1
First we emptied and washed our jars. I removed all labels (degreaser does the trick) and made sure they were clean and dry. I also spray-painted my jar lids pink but you don’t have to do that. You can cover them with silk flowers or even leave them plain.
Step 2
Then we made our polymer fish. Polymer clay is really fun to work with but this might be the part of the craft where some of you get frustrated and tell Pinterest that I’m drunk. First, knead your clay for a good few minutes to get it soft and pliable. Then take a small bit and work it into a fish shape. It takes some time to get your fish just right but give them some love and you’ll get it. We found that adding detail with a toothpick really made our fish look more fish-like.
Step 3
When you have your fish formed, use your needle to poke a hole through the fish’s belly from the top to the bottom. This part is a bit tricky because when your fish is strung with thread, you want it to hang so it is swimming horizontally and not from it’s head or it’s tail (That would be a sick fish!). So you want to be careful where you put your hole so that it’s weighted and balanced evenly. After you’ve figured out your center (this might not be the visual center) thread it and double check. Then wiggle your needle around so that the hole will be big enough to thread after you’ve baked your polymer fish.
Step 4
Yes, that’s right, you’ll bake your fish! Sort of like fish sticks but not! It’s easy and it doesn’t even smell. Lay your loveably lumpy fish out on a baking dish and bake them in the oven at 230º F for 30 minutes (Please follow all the directions closely with your polymer clay. Overcooking polymer clays can release toxic chemicals into the air. Also keeping the kitchen well-ventilated is always a good idea. Also, don’t use your food-baking pans but instead use a dedicated one for non-edible crafts when baking polymer clay because of the chemicals). Remove with potholders and then let them cool.
Step 5
When the fish are cool you can thread them. Pull the thread almost all the way through but stop the thread from going through with a dab of hot glue.* Let that cool and then cut your thread to the length you want it to hang from the top of your jar lid to where it would be swimming. On our jars this was about an inch and a half but if you use larger jars you’ll want to test a longer length before cutting.
Step 6
Then attach your thread to the top of the jar lid and let everything cool.
Bonus Steps!
Now for the fun part: adding glitter water! You can certainly stop here. The fish look super cute swimming in air but if you have kids doing this craft with you, I’m pretty sure they will want to step it up a notch with glitter and water.

First you will need hot water. This will help your glitter glue dissolve and keep anything funky from growing in your jar. I used a kettle and boiled my water and then let it sit for several minutes until it wasn’t too hot to touch. You could probably use very hot tap water and it might work too.
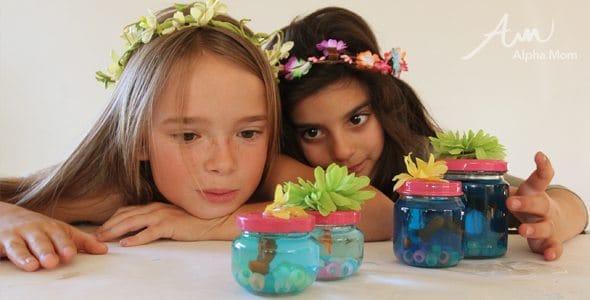
Next you will add your glitter glue to the water. How much you add is up to you. We used an entire glitter glue bottle for all over our jars but then we were going for maximum effect. You may like less. Stir the glitter into the water with a whisk. This may require some whipping to get the glue to dissolve into the water. When it’s dissolved pour into your jar. My girls chose to add a drop of blue food coloring but I personally would have skipped that step. I think it made the water a little murky but they convinced me it was more fun.
We added some plastic beads to the bottom of our jars for effect (and they glow in the dark too!). Then we added the water and capped it off with our goldfish strung lids. We glued a pretty flower to the top and Tahdah! Our glitter goldfish were happy little swimmers!
Some notes
If your jar leaks, just pipe a thin line of hot glue around the seal.
If you have strung more than one fish, you might not want to use your jar as a shakeable snow globe type fishbowl because your fish will get tangled together and be forever stuck swimming as a group. But if you only have one fish, shake away!
If your fish come unstuck from the lid for some reason (maybe you assembled the jar a little before everything was cooled) have no fear, you can always dump out the water, let everything dry and then start again.
Enjoy! Happy Norooz! Happy Nowruz!
* Remember hot glue guns are not for kids. They can burn!
Difficulty level: not for the faint of heart or easily frustrated but oh-so worth it if you have the time. Children will enjoy working with clay, mixing their glitter solution and playing with their fish.