Handmade Holiday Stamps
By Alana Reynolds
Who doesn’t love to play with rubber stamps? They are easy for all ages, low on mess, and instantly gratifying. We have a pretty good collection at our house but I’m always on the lookout for more. The problem is stamps can be pricey and, no matter what, it’s tough to find the perfect design. Recently, I started to think about how we could make our own stamps at home – something beyond carving a potato or cutting up a sponge.
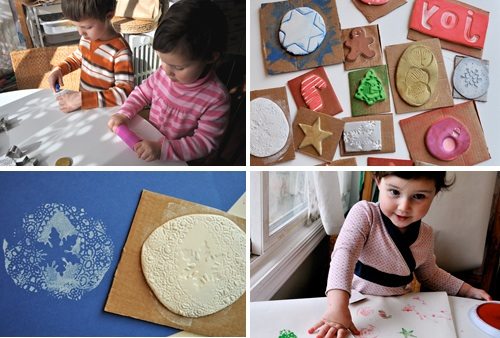
I experimented with a few things but the ones I made with Model Magic, the fast-drying modeling compound made by Crayola, turned out beautifully. Model Magic is extremely pliable and air-dries into a sponge-y but smooth texture so the stamps both held their shape well and made a good surface for the ink. Because the compound is like clay or dough, you can both press things into it to make hollow-relief impressions or cut it into shapes like a regular stamp. It’s not perfect (the surface comes out a little uneven, the compound can crack or dry with a wrinkle) but the imperfections are part of the charm. It results in unique stamps that have a lovely handmade look.
My kids and I spent two afternoons creating these. The first afternoon we created the stamps, let them dry overnight, and then the next day we stamped cards, gift tags, and wrapping paper. Both of them, my 3-year-old and my 6-year-old, loved this craft. Although I have to say my 3-year-old was happier on the stamping day. The “let’s put this away to dry” part of making the stamps was a little abstract (and tantrum-inducing) for her. In general though, it is one of those great craft projects that’s both easy and satisfying for all ages.
Since we celebrate Hanukkah and Christmas in our family it was fun to come up with different stamps for both holidays. And not only did we get to make our own stamps but we ended up with a pile of holiday cards, gift tags, wrapping paper, and ornaments for the season. Best of all, we can use the stamps again and again to make more. It also occurred to me that we could make some and give them as gifts, maybe in a basket with a stamp pad and some nice paper. All in all, it’s the craft that keeps on giving!
To make your own stamps you’ll need:
1. Crayola Model Magic (you can get this any place where kids’ craft supplies are sold.)
2. Scissors
3. Scrap cardboard or scrap wood pieces or spare wooden blocks (These are for making a base for the stamp; we cut pieces from the top of a pizza box.)
4. Rolling pin (or something similar like a jar or a dowel to roll compound out).
5. Sculpting knife or table knife for shaping
6. Stamp pads, ink daubers, and/or poster paint
7. Card stock, construction paper, newsprint, wrapping paper, etc.
8. Various items and tools to make stamp shapes and impressions (here are some items we used):
• cookie cutters (mini ones work great, as do fondant cutters)
• shaped foam stickers
• small ornaments
• doilies
• refrigerator magnet letters
• pastry cutter
• toothpicks/skewers
• hanukkah gelt
• candles
And a couple things we thought of but didn’t have on hand:
• rick-rack
• pinecones
• fir branches
• embossed christmas cards
• dreidels
There are so many possibilities; I’m sure you’ll think of many other objects and tools to use to create your stamps.
Part 1: Making Your Stamps
Cut up your scrap cardboard into squares. They can be any size depending on how big or small your stamp will be. If you’re using scrap wood pieces or wooden blocks wipe them down and make sure they’re free of dirt or sawdust.
Take a piece of Model Magic and roll it into a ball. Use your rolling pin to roll out the compound. It should be pretty thick (anywhere from 1/2 inch to 1/4 inch) if you’ll be making impressions; it can be thinner if you will be cutting out a shape.

For the shaped stamps use a cookie cutter, a knife, or scissors (which cut Model Magic surprisingly well) and create your shape.
Carefully lift the shape (a spatula can be handy for this) and place on your cardboard or wood base.

Use a toothpick or another tool to create a texture or design on the shape if you’d like.

For the pressed stamps take your rolled out circle and place on cardboard base. You can also use a knife or scissors to cut the circle into a more traditional rubber stamp square shape if you like. Take your object and press it down into the compound until you get the impression that you want.

After making your stamps, but before setting them aside to dry, turn them over onto a clean, smooth surface. Apply light pressure (not too hard, the compound is very soft) to smooth out your design and create a nice, flat surface for stamping. You can also run your rolling pin lightly over the compound for the same effect. You won’t get it perfectly smooth, but that’s okay. Just smooth enough to make sure the outline comes through.

Set stamps aside to dry for 8-12 hours at room temperature. (Try not to put them close to a heat source – too much heat can cause compound to crack). You can use them after 8 hours, but for them to be fully dry, it’s best to wait overnight.
Part 2: It’s Stamping Time!
When your Model Magic stamps are dry you can use them to stamp your designs. We used ink pads, ink daubers, and poster paint. You can use any or all of these methods.
Stamp pad
This is most straightforward method. We have a couple oversized stamp pads that made working with all these different sized stamps a cinch. Look in the kids’ section of your craft store for oversized washable ink pads. They’re usually priced better than ones in the stamp/scrapbooking area.
Press your stamp down into pad. Check first to see how it inked. Since the surface of the stamp is not perfectly smooth it’ll probably take a few times on the pad. If you want more coverage press again with a rocking motion or rub softly on the pad surface. When you have enough coverage, press firmly onto the paper of your choice. One tip: put your paper on top of some folded newspaper or a piece of cloth or felt before you stamp it. This makes the paper a little more flexible and the image will come out clearer.

Ink Dauber
Use an ink dauber (small inked pad) and lightly dab it onto your stamp to cover the surface. I found this to be the best method for these handmade stamps since it is the best way to cover a surface that is a little uneven.

Poster Paint
You can either brush a thin coat of paint directly on the stamp or apply paint onto a plate or other smooth surface and use like a stamp pad. Foam paint brushes work well for this but regular ones will work too. Be sure to clean paint off of your stamp with a damp (not wet) cloth or paper towel before it dries if you plan on using the stamp again. This method is great for making wrapping paper.

I hope you enjoy your stamps and all the fun stuff you will make with them.

************
Alana Reynolds is one talented mutha. She’s a poet, crafter and cool lady. Follow her– like I do– at her personal blog Letter B.
Discover More Holiday Crafts on Alphamom:
- Ombre Paper Dreidel Printable for Hanukkah
- Children’s Art Ornament
- How to Make a Jigsaw Puzzle Holiday Wreath