Fourth of July Citronella Candles
It turns out citronella candles are pretty easy to make! They are a bit fussy and require a lot of microwaving and some pouring of hot wax but the end result is fun and pretty. This craft is not especially toddler-friendly but I think it would be great for older kids who can be trusted in the kitchen, or for younger kids who have a lot of help from an adult.
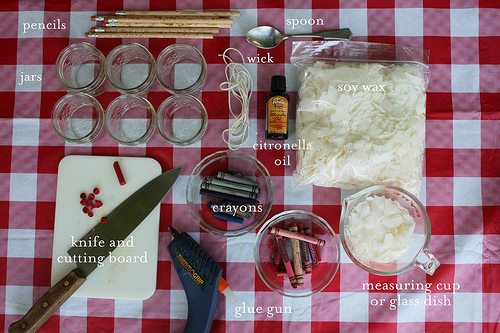
Supplies you’ll need to make candles:

- • six 1/2-pint regular canning jars (found in grocery stores)
- • 1 lb. microwaveable soy wax (found in craft stores)
- • a glass measuring cup for melting and pouring
- • a spoon for stirring
- • several old crayons in red and blue
- • a cutting board and knife
- • citronella oil (found in health food stores)
- • braided candle wick (found in craft stores)
- • scissors
- • six pencils or dowels
- • a hot glue gun
- • a microwave
There are a lot of variations you can do with these candles. You don’t have to use canning jars, you can use odd recycled cans or jars you already have at home. Just make sure you wash them out and dry them carefully before you start. You also don’t have to use microwaveable soy wax. In fact, I think paraffin wax might even be better at keeping the bugs away since it is known to give off more smoke and that is what keeps the bugs away. I chose soy wax because it was easier. I’m not known for my kitchen skills and double boilers give me the willies. Whatever you end up using, just make sure you buy the right kind of wicking. It is usually printed right on the package what kind of wick goes with what kind of wax.
Now lets get started!

First you’ll need to prepare your jars. With a hot glue gun place a dab of glue in the bottom center of the jar. Then carefully place the end of your wick into that glue (the end of a pencil will help you here so you don’t burn your fingers) and stick it down. Wrap the other end of the wick around a pencil, cut it and then tape it down to the pencil. This is so the wick will stay in the center of your jar and out of your way when you are pouring your hot wax.

To color your wax you can either use special candle dye found in craft stores or you can use up those old broken crayons you have around the house. I vote for crayons. (I would recommend you avoid the cheap waxy crayons though. Their dyes are not effective.) Peel your crayons and cut them into small shavings with a knife and a cutting board. Be careful of course! I don’t want anyone chopping their fingers while doing this craft!
Now you’re ready to rumble! Pour one-third of your unmelted wax into your measuring cup and microwave it in 30 second increments until it has turned clear. You can add your crayon shavings before you melt the wax or after, it doesn’t really matter. If you want more control over your color you should add it later so you can see how dark the crayons will make the wax. However the wax does lighten as it cools so err on the dark side. I would say roughly five or six red crayons and four or five blue crayons. For some reason the blue took darker for me. But this is open for experimentation.
Once your wax is melted, now you can add the citronella oil. (A word about citronella oil: Buy the real citronella oil that you can find at health food stores. Do not use the citronella-scented oil that’s used to fill tiki torches. It doesn’t work and it’s extremely flammable.) I added three to four drops of the citronella to each third of wax. Some people say use less to avoid separation but I didn’t have any problem with mine. Mine were quite smelly and delicious! I mean, if you like the smell of concentrated orange peel of course, which I do. (Handling of citronella oil should be done by responsible adults only. Please keep citronella oil out of reach of children).
After you’ve stirred in your citronella oil and crayon shavings you are ready to pour!

This part can be messy so take your time and make sure you are working on a surface that can be easily cleaned up. Start with your red wax (or whatever color stripe you want to be on the bottom) and pour a small layer of wax into each jar. I measured my stripes into fourths, leaving the top fourth open so that there was room for the wick to breathe and not blow out at the slightest hint of a breeze. Let each layer cool completely before adding the next layer.

When the candles are cooled, remove your pencils or dowels and trim the wick to 1/4 inch above the wax. Then you’re done. These candles are ready to light up any Fourth of July celebration.

If you’ve saved your jar lids you can print up some cute labels and stick them on top for gift-giving!