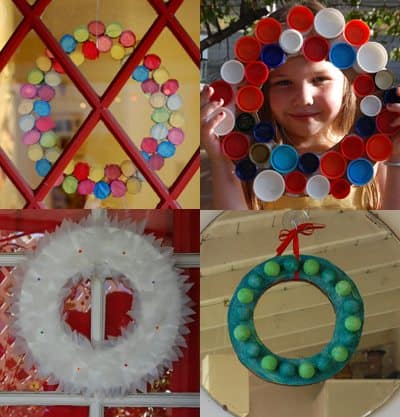
DIY Holiday Wreaths
Choose your own wreath adventure!
By Brenda Ponnay

I think the best way to invent a craft is to deconstruct an everyday object and figure out a way to make it better or with different materials. This month I decided to tackle the common Christmas wreath. Little did I know that there are many many many ways to decorate a humble circle into something festive and fun. You don’t have to look far to find interesting materials. Most of these wreaths were made with items from my own recycling bin. Some of these wreaths were super easy and kid-friendly while others were a bit fiddly and probably more fun for the older, craftier types.

First I decided to make a wreath out of toilet-paper tubes. I know, you’re probably sick of making things out of toilet-paper tubes but they are so handy and universal. Everybody has them and they make such nice perfect circles. This one was great for kids in the beginning but needed a little adult supervision during the assembling.

You’ll need about three or four tubes for the small version of the wreath and about 20 for the bigger version. If you’re like me, you stockpile these tubes for such crafts. If you don’t, then you can start saving now and do this craft later on.
Here is what you’ll need altogether:
- toilet-paper tubes cut into thirds
- tissue paper in various colors, cut into 4-inch squares
- white glue
- paintbrushes for painting glue
- a stapler (a mini one if you have it)
- scissors that can cut cardboard
- tape and/or a glue gun (optional)
After you’ve cut your tubes, sit your kids down and let them paint glue along the outside of the tubes. Set a square of tissue paper on top of each tube and press the sides down so it sticks to the glue—kind of like covering a bowl with plastic wrap. Set them aside and let them dry. After you have enough covered tubes you can arrange them in a circle and begin connecting them by stapling them together.
If you don’t have a stapler, you can connect the circles with a glue gun and reinforce the bonds with tape.


Attach a ribbon and hang!

This next wreath really surprised me. I have been wanting to work with translucent plastic for a long time but had never come across materials that were easy to work with. Then I discovered the plastic milk jug and a whole new world opened up for me. Plastic milk jugs make beautiful wintery white feathery leaves! Who knew?!!
This wreath is not quite as kid-friendly, as the plastic can be a bit sharp and cutting it can require some fine motor skills and strength. But it is definitely worth the work if you are into that sort of thing like I am. For a wreath like mine you’ll need:
- 4-5 rinsed milk jugs or water cartons
- a trusty glue gun with lots of refill glue sticks
- white foamcore board or posterboard
- a small string of battery-operated christmas lights (optional)
First, cut your wreath base out of your white board. If you want to add Christmas lights like I did, you’ll need to puncture some holes in your board. I did this using a fat nail and a hammer but I’m sure a drill would work well too. You’ll also want to punch two holes near the top that you can use later for wiring the battery pack and a ribbon for hanging.

Next you’ll need to make the leaves for your wreath. When you’re cutting up the milk jugs, it’s easiest if you just stick your scissors in through the opening and cut down the side. The bottoms can be a bit tougher to cut but if you have the strength, they are just as useful as the rest of the jug. The only part that you won’t need is the handle and where the label might have been if you’re like me and can’t be bothered with soaking it off.
Cut out a few handfuls of leaves and then start gluing! You can cut more as you go if you don’t have enough. But if you’re adding Christmas lights, you will want to make sure you have your lights poked through their holes before you start gluing so that you don’t accidentally cover up a light hole with a leaf.

I started on the edges and worked my way inward with no particular pattern other than what I thought was pleasing to my eyes. I’m sure you could create pretty flowers or perfect rows if you wanted to but I found that my willy-nilly gluing worked great. This type of milk-jug plastic adheres quickly and easily to hot glue.

When you’re done, wire the battery pack in place, attach a ribbon and hang!

This next wreath I like to call “Free Form” or self-directed. It’s really great for kids because you can just set out materials and let them go crazy. You’ll be surprised what they can come up with and every single wreath will be unique.

The hardest part is cutting out the cardboard circles. I have two words for you: good luck. If you can get someone else to cut them out for you, try that. If not then just use two bowls or lids of different sizes for tracing your circles onto the cardboard and then cut them out with a box cutter. It’s a bit of a pain but when you see a table full of happy kids covering their creations, you’ll look down upon all your hard work while flexing your sore hands and smile. If you don’t want to cut out the circles, you could just draw a wreath on posterboard or cardboard and let them fill it in.

For materials you’ll need:
- cardboard rings
- glue
- paint, glitter, buttons, marbles, lids—whatever you can find in your house to decorate with
- ribbon for hanging
- kid power

Whatever you do, just have fun.

For my last wreath I had a vision. I wanted to make a wreath out of light green and dark green foam balls. I had a clear picture of how fun it would be to roll foam balls around in a tray of paint. Then I’d stick the foam balls into a foam wreath with toothpicks or something. They would pop with retro/modern grooviness. Can’t you just see it in all its 3-D polka-dot glory?
Well, that’s all you’re going to see because that idea crashed and burned. I walked into the craft store and found that foam balls cost five bucks for a pack of six. WHAT!?! I am SO not going to spend $50 on a silly foam-ball wreath. Especially when there is a perfectly good already-made feather one in the dollar bin right next to the foam balls. Bah, humbug! So I shelved that idea in the back of my head where all my other great ideas go to die and figured it was a goner.
Then I walked into a dollar store and discovered that a six-pack of ping-pong balls was MUCH cheaper. Providence! I didn’t have the foresight to load up on several boxes of them but I did buy three boxes for three bucks. Not bad. So this wreath is not quite as grand as my original idea but it’s still pretty nifty I think.
Here is what you’ll need:
- a cardboard ring
- ping-pong balls
- cheap acrylic paint in two shades
- glitter
- a trusty glue gun

The golf balls were definitely just as fun to roll around in paint as I imagined the foam balls would be (though I had to water my paint down a little bit). After they were covered in paint we set them to dry on some paper and shook glitter on top.
Once they were dry, I glued the balls in an alternating pattern to my cardboard ring, added a pretty ribbon, and was done.

It’s simple, yet perfectly festive and fun!
All of these wreaths were quite enjoyable to make, actually. I could make 50 more! But I won’t because this post is already quite long. I hope you can find one that makes you happy too.