A Modernized, Gluten-Free Chicken Pot Pie (Sort Of)
The men in my house love chicken pot pie, the kind you buy in the freezer case at the supermarket. I can’t eat those (because I can’t have the gluten) and I prefer homemade, anyway. And as long as I’m creating, I’d rather have cornbread than pie crust.
This recipe is sort of an updated-to-be-gluten-free-and-a-little-healthier version of what would happen if a chicken pot pie and an old-fashioned chicken casserole ran into each other like the peanut butter and chocolate in those old Reese’s commercials. Just trust me.

Ingredients for our Gluten-Free Chicken Pot Pie
For the casserole:
1 – 1 1/4 lbs chicken breast
1 – 1 1/4 lbs sweet potatoes (2 good-sized potatoes)
1 medium sweet onion
3 cups mixed frozen veggies (I used green beans and peas this time)
2 TBL chili powder
1 TBL dried thyme
2.5 – 3 cups chicken stock
1 cup milk
3 TBL cornstarch
olive oil, salt, pepper
For the topping:
1 cup cornmeal
1 cup all-purpose flour of your choosing (use regular flour if gluten is not an issue; I use Better Batter to keep the dish gluten-free)
2 tsp baking powder
1/2 tsp salt
1 beaten egg
1/4 cup honey
1 cup plain yogurt
1/4 cup milk (as needed)
1/4 cup vegetable oil
Directions for our Gluten-Free Chicken Pot Pie
Preheat oven to 350 degrees. The bad news is that the first two things you have to do take the longest; the good news is that you can do them ahead of time (I sometimes do it the day before or the morning of). I use frozen chicken breasts, and they usually require about 40 minutes in the oven. Thawed chicken will cook faster, of course. Nothing fancy is necessary here—slap them in a baking dish with a little salt, a little pepper, and a tiny drizzle of olive oil—and into the oven they go to cook. Once they’re cooked (no visible pinkness, a small cut to the thickest part reveals only clear juices), you want to shred the meat. You can do this with two forks, or if have a stand mixer, throwing the breasts in there with the paddle attachment will shred up the meat like magic. (I just learned that trick recently, and it’s kind of fun to watch.)
While the chicken is still in the oven, peel the sweet potatoes and cut them into about 3/4″ chunks. Toss them in a dish with a generous drizzle of olive oil (a tablespoon or two), a little salt and pepper, and the chili powder. (Roasting the potatoes rather than boiling, and doing so with the chili powder, adds a little more depth of flavor to the finished product. Also, don’t be afraid of what seems like an enormous amount of spice, because this will be mixed throughout the whole casserole, later.) The potatoes can go into the oven while the chicken is still in there, though they may take up to a full hour to become fork-tender. Stir them a couple of times during cooking to keep them from sticking.
Once these two ingredients are ready, you can either refrigerate them for later use or move on to the rest of the preparations.
Preheat oven to 400 degrees. Dice up the sweet onion and cook it in a large chef’s skillet or Dutch oven (I like my skillet, but if you use a Dutch oven you won’t need a separate pan for baking, later) with a tablespoon of olive oil and a little salt and pepper. Do you need this step? Again, taking the time to pre-cook the onions like this makes the final product a little more flavorful, a little less Grandma’s-casserole-that-involved-canned-soup, but it’s up to you. I like to go ahead and caramelize them because sticky-sweet onions make everything better. Once the onions are brown and delicious-looking, add your mixed frozen veggies, your shredded chicken, the sweet potato chunks, and your thyme. Mix it all up and add 2.5 cups of chicken stock. Depending on how much chicken and sweet potato you’re using, you may need up to an additional half a cup of stock to nearly cover the contents of the pan. (This recipe is very forgiving when it comes to proportions, so don’t worry too much.) Allow everything to come to a simmer while you mix your 3 tablespoons of cornstarch into a cup of milk. Add this mixture to your bubbling pan and mix well; let it all simmer together for about five minutes, or until the liquid thickens up. Taste it to see if you need more salt/pepper, and adjust accordingly.
While your casserole mixture is simmering, mix up the cornbread by putting the dry ingredients into a large bowl and then adding the wet ingredients. Confession: You can use any cornbread recipe here that you like, really. My recipe is a very basic tinkering of the “Easy Corn Bread” recipe on the back of the cornmeal canister, but I do like the tang of the yogurt along with the mild sweet of the honey. Just bear in mind that yogurt varies in thickness, and you may or may not need to add the milk to reach a smooth but firm consistency with your batter. Also, some people believe that adding sugar or honey to your cornbread is a sin. I am not one of those people.
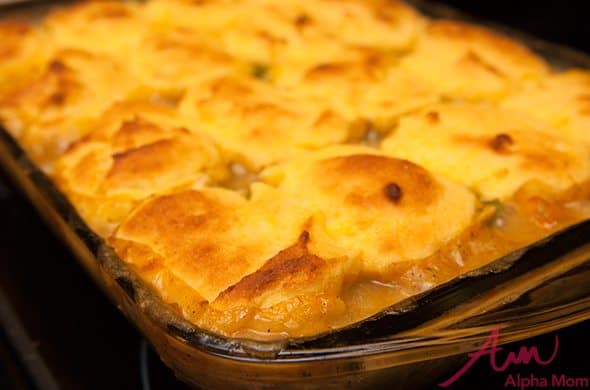
Time to bake! If using a Dutch oven, you’ll add the cornbread mixture right on top. If you cooked in a big skillet, pour the contents into a 9″ x 13″ oven-safe dish. Either way, top with spoonfuls of the cornbread mixture spread evenly across the surface. Cook for 30 minutes and then check it; you’re looking for the cornbread to have browned peaks/edges, and you may need another 5 or 10 minutes of cooking time to achieve that.
Additional Notes on making Gluten-Free Chicken Pot Pie
This Chicken Pot Pie recipe lends itself very well to the “I’ll throw in whatever I have around” model of cooking. It’s difficult to go wrong; substitutions based on taste and your pantry are not only fine, this is the perfect vehicle for experimentation. The resultant dish is guaranteed to be homey without being bland, filling without being heavy. It’s mostly vegetables, and even if you only use a pound of meat, one pan will easily serve eight people (maybe more).
And ever since I started making this, no one has asked for pre-made pot pie.